
It’s such a bummer when you walk out to your vegetable patch only to find drooping foliage and mushy stems, signs that root rot has moved in. I know how frustrating it is—after all, watching tomatoes or zucchinis crumble underground feels like a personal defeat! But fear not: with some strategic steps, you can turn that soggy patch of soil into a thriving, disease-resistant garden. I remember the first summer root rot hit my peppers—I felt defeated until I started implementing these tips. By understanding the disease and its preferences, you’ll be one step ahead next time we get a heavy rain or an errant hose left running!
As a gardener who’s rescued more than a few beds from soggy doom, I’m excited to share thirteen tips—each backed by practical experience—to keep your veggies standing tall and healthy. Whether you favor heirloom tomatoes (Solanum lycopersicum, native to western South America) or hardy root crops like carrots (Daucus carota, native to Europe and southwestern Asia), these strategies apply across the board. Some tips involve enlisting beneficial microbes to nest in your soil, others focus on soil structure, and a few hinge on choosing the right plant varieties (always check if that cover crop is native or potentially invasive!). Let’s dive in—randomized order, two paragraphs each, and plenty of enthusiasm to keep you motivated!
Avoid Overwatering; Monitor Soil Moisture

One of the quickest ways to invite root rot pathogens—like Pythium, Phytophthora, or Fusarium—into your garden is by overwatering. These soilborne fungi thrive in consistently wet, poorly aerated soils. I’ve lost entire rows of cucumbers because I intuitively watered every evening, only to realize later that the saturated soil was essentially a spa for rot-causing spores. To prevent this, invest in a simple soil moisture meter or learn to judge by touch: stick your finger two inches into the soil—if it’s still damp, wait another day. Your plants’ roots need oxygen to breathe, and wet soil suffocates them, creating the perfect environment for fungal growth.
On top of that, overwatering reduces beneficial organisms that would otherwise help suppress pathogens. Earthworms, for instance, avoid waterlogged conditions and will seek drier patches where they can nest and aerate the soil. When the soil is too damp, you might notice fewer night crawlers and an increase in slugs or snails feasting on decaying plant material—a sign that the microbial balance is off. By letting the topsoil dry slightly between waterings, you encourage earthworms to tunnel, creating better drainage and minimizing disease. Trust me, once you see those wriggling friends return, you’ll know you’re on the right track!
Inspect and Remove Infected Plants Promptly

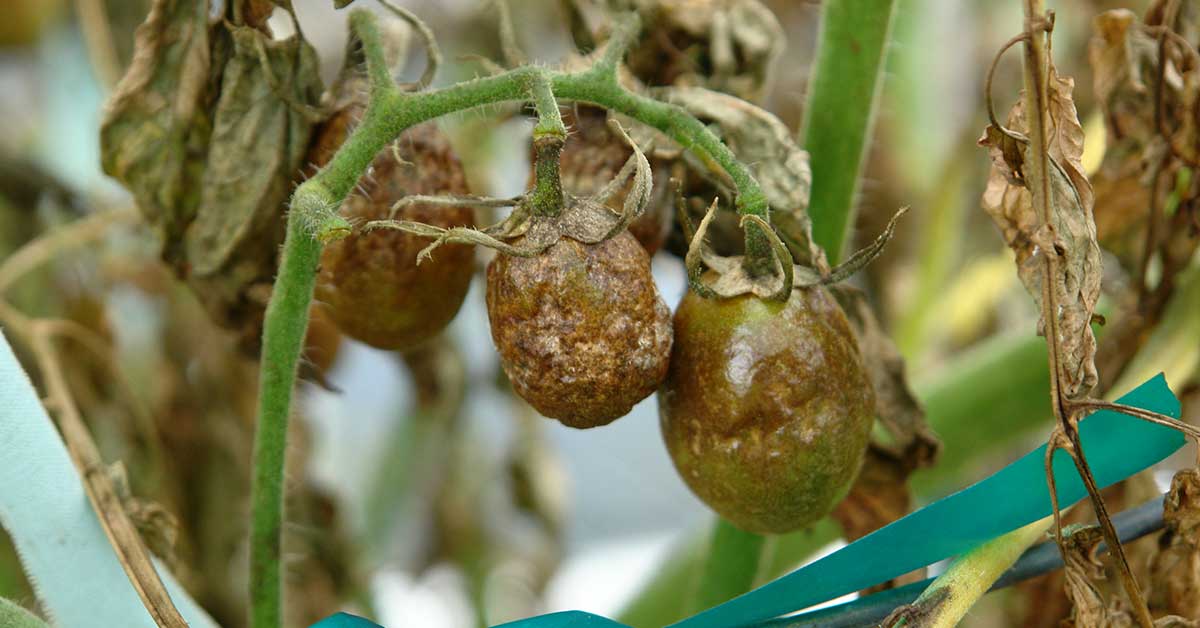
When root rot begins, early detection is your best weapon. As soon as you spot yellowing leaves, wilting stems, or a foul, musty odor near the base of the plant, it’s time to investigate. Gently tug on the plant—if it slides out easily, with dark, slimy roots, you’ve likely caught root rot early. I once neglected a single squash plant with slightly yellow leaves, and by the next week, the fungus had spread to two neighboring pumpkins. My lesson? Immediately remove any suspect plants, roots and all, and dispose of them away from the garden—never compost, since spores can survive and reinfect your beds.
While digging out the infected plant, check the surrounding soil for signs of overcrowding by other pathogens. If you spot tiny white fungal threads or blackened root fragments in adjacent soil, you might need to remove a small trench around the infected area to ensure you’ve excised all sources of infection. Disinfect your tools with a 10% bleach solution afterward—this extra step helps prevent carrying pathogens to healthy areas of the garden. Removing infected plants not only stops the spread but also lets air reach the soil surface, allowing beneficial fungi and bacteria to recolonize and outcompete rot-causing organisms.
Provide Adequate Spacing and Aeration

Crowding plants may look lush, but it’s a fast track to root rot if airflow and drainage suffer. Roots need oxygen, and densely planted beds can create pockets of stagnant, waterlogged soil. In my early gardening days, I jammed too many pepper seedlings into a single bed—by midsummer, one storm flooded the area, and root rot raced through the crowd. Now, I follow spacing guidelines religiously: for tomatoes (native to western South America), I keep at least 24 inches between plants, and for bush beans (Phaseolus vulgaris, native to Central and South America), about 4–6 inches, ensuring each plant gets enough soil oxygen and airflow around its base.
Airflow at ground level also affects above-ground canopy conditions: plants with crowded leaves create humid microclimates where fungal spores can thrive. If you see leaves staying wet long into the afternoon, consider trimming lower foliage or thinning overcrowded sections. Beneficial insects like ground beetles and rove beetles (which feed on small soil pests) will appreciate the drier, more open conditions—and you’ll notice ants and slugs (which sometimes feed on decaying roots) moving elsewhere. Adequate spacing isn’t just about looks; it’s about creating a balanced, aerobic environment where root rots find it much tougher to gain a foothold!
Use Raised Beds with Well-Draining Soil
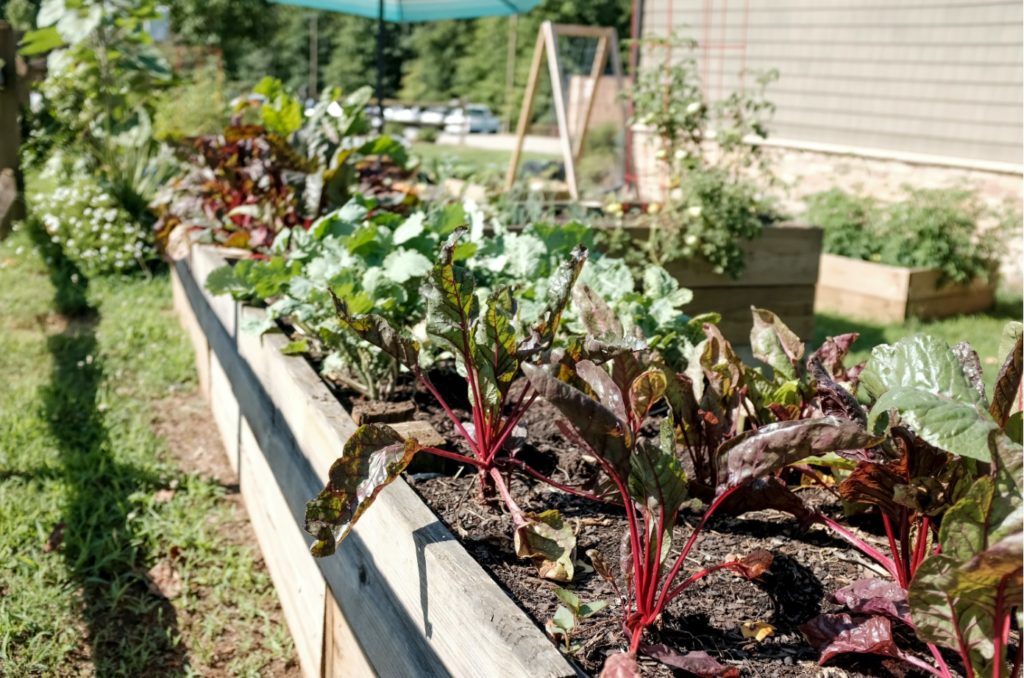
Building raised beds is like giving your vegetables a VIP pass to well-drained real estate. When soil is built up—in a box made of rot-resistant wood, composite, or even stone—it drains faster than ground-level beds, preventing water from pooling around roots. I installed my first raised beds in a particularly clay-heavy corner of the yard, and what a difference: carrots, lettuce, and onions (Allium cepa, originally from central Asia) began flourishing with far fewer dead patches. Of course, you’ll want to fill those beds with a mix of loamy topsoil, compost, and coarse sand or perlite to maximize drainage.
Raised beds also warm up faster in spring, which can accelerate root development, making plants like peppers and tomatoes less susceptible to early fungal invasion. Because these beds are slightly elevated, they’re less likely to harbor voles and gophers that can gnaw at roots and create wounds, giving pathogens an entry point. I’ve found that earthworms and beneficial microbes flock to well-structured raised beds, nesting in the rich organic layers beneath the surface. Their tunneling activity further enhances drainage, creating a virtuous cycle where healthy soil conditions ward off disease naturally!
Plant Disease-Resistant Varieties

Selecting vegetable varieties bred for resistance to Phytophthora and similar root rot pathogens is like buying insurance for your garden. For example, certain tomato cultivars—such as ‘Defiant PhR’ or ‘Mountain Majesty’—carry genes that deter Phytophthora infestations. Knowing that tomatoes are native to the Andean regions, breeders have long worked to cross local wild species (some of which can withstand damp, cool conditions) with modern hybrids to imbue resistance. When I grew ‘Defiant PhR’ during a particularly wet season in spring, it stood tall while nearby susceptible heirlooms collapsed within a week of heavy rain.
Of course, check if your chosen variety is open-pollinated (OP) or hybrid (F1) and whether it’s recommended for your climate. While hybrids often dominate resistance lists, some OPs like ‘Brandywine Red’ have moderate tolerance and won’t spread invasively in seed-saved beds. Always read seed catalogs or plant tags for “Phytophthora-resistant” or “Fusarium-resistant” designations. When you plant resistant varieties, beneficial soil fungi—like Trichoderma species, which naturally prey on pathogen spores—thrive alongside healthier roots, nesting in root zones and helping to suppress disease from the moment seedlings establish!
Rotate Crops to Break Disease Cycles

Crop rotation is a classic strategy that works wonders against root rot, which can survive in soil for multiple seasons if you keep planting the same species family. For instance, beans (Phaseolus spp.) and peas (Pisum sativum; native to the Mediterranean basin) are legumes in the Fabaceae family—if Phytophthora or Fusarium infects them one year, planting them again in the same spot invites trouble the next. Instead, follow a three- or four-year rotation: after harvesting beans in year one, switch to brassicas (like broccoli, native to the Mediterranean) or root crops (like carrots, native to Europe and SW Asia) in year two, then nightshades (tomatoes, peppers) in year three. This rotation breaks up pathogen populations by denying them a familiar host.
When you rotate, you also encourage a diversity of beneficial organisms that nest in different root zones. Earthworms might favor the nitrogen-fixing environment left by legumes, while predatory nematodes thrive in soils formerly occupied by brassicas. I noticed a marked drop in root rot after I began rotating my cucumbers (Cucumis sativus, native to South Asia) into a patch formerly planted with onions (Allium cepa) and then moving them to where squash had grown. Each crop change meant fresher microbial communities—bacteria and fungi that don’t feed on the previous crop’s root exudates—helping keep disease pressure low. Trust me, rotation is one of the easiest, most cost-effective tips in your arsenal!
Test Soil pH and Nutrient Levels

Root rot pathogens often exploit plants weakened by nutrient imbalances. Soil pH is key: many vegetable crops prefer a slightly acidic to neutral pH (6.0–7.0), but certain root rot fungi thrive when pH dips below 5.5 or climbs above 7.5. I once battled persistent Fusarium in my eggplant bed—after testing, I discovered the pH had dropped to 5.2 due to years of heavy nitrogen application. A few pounds of garden lime raised pH to 6.5, and within weeks, the eggplants perked up, more resistant to root inoculation. Regular soil tests also reveal nutrient deficiencies—like calcium or magnesium—that hamper root cell walls, making them more susceptible to fungal penetration.
Testing nutrients is equally crucial: overly high nitrogen levels can encourage lush top growth at the expense of a robust root system. I used to apply high-nitrogen manure every spring until I realized my tomato plants (Solanum lycopersicum) developed shallow roots that withered under midseason stress. Switching to a more balanced fertilizer—like a 5-10-10 blend—promoted stronger root development. Meanwhile, micronutrients like boron and manganese play subtle but vital roles in root health; deficiencies can create small cracks in root tissue where pathogens can enter. By collecting a soil sample every two years and sending it to a local extension service, I keep tabs on pH and nutrient levels and know exactly what amendments my garden needs to stay rot-free!
Solarize Soil to Kill Pathogens

Soil solarization is a summer secret weapon for sun-rich regions. Between hot June and August days, laying clear plastic (4–6 mil thickness) over moist garden beds for 4–6 weeks can heat the top 6–12 inches of soil to temperatures lethal for many root rot pathogens. When I discovered that Phytophthora persisted under my asparagus bed, I solarized that spot for five weeks in July. The ground temperature hit 130°F under the plastic, effectively killing not only Phytophthora but also weed seeds. Solarization also creates favorable conditions for beneficial bacillus bacteria, which emerge later to recolonize the soil and outcompete any surviving pathogens.
Before solarizing, I always rake the bed to remove debris and then water heavily to saturate the soil—moisture conducts heat more effectively. After sealing the plastic edges with soil or rocks, I leave it undisturbed until mid-August. During this time, I often watch ground bees or predatory ground beetles move away from the treated area, seeking cooler spots to nest. Once the plastic’s removed, I plant heat-loving crops like okra (Abelmoschus esculentus, native to tropical Africa) or sweet potatoes (Ipomoea batatas, native to Central and South America), which benefit from the sterilized conditions. Note: solarization isn’t effective in shaded or northern gardens where heat buildup is insufficient, but if you’ve got plenty of sun, it’s a powerful, chemical-free tactic!
Use Cover Crops to Improve Soil Structure

Cover crops aren’t just for winter; planting fast-growing summer covers like buckwheat (Fagopyrum esculentum, native to Southeast Asia) or cowpeas (Vigna unguiculata, native to Africa) between main-season vegetable plantings can help break up compacted soil and “squeeze out” pathogens. Their roots drill through dense layers, creating channels for air and water to move freely—ironically making life tough for water-loving fungi. I planted cowpeas after pulling my spring onions, and within six weeks, the soil became noticeably friable. Earthworms moved in by the dozens, nesting in the loose medium and further enhancing drainage.
After cutting down your cover crop, leave the residues on the surface as mulch. This organic layer fosters beneficial fungi—like Trichoderma and Glomus species—to colonize, outcompeting root rot pathogens. Plus, buckwheat flowers attract hoverflies and small solitary bees, which feed on nectar while depositing beneficial microbes on the soil surface. Just be cautious: some cover crops, like some heirloom mustard varieties (Brassica juncea, native to the Himalayas), can become invasive if not terminated before setting seed. I once let mustard go to seed by accident—the seedlings popped up everywhere! Now I always mow or mow-and-burial before bloom, ensuring they improve my soil without turning invasive.
Introduce Beneficial Microbes and Mycorrhizae

Adding beneficial microbes—commercial inoculants containing Trichoderma harzianum, Bacillus subtilis, or mycorrhizal fungi like Glomus intraradices—gives your plants a living shield against root rot pathogens. These friendly microbes colonize root surfaces, outcompeting or even attacking harmful fungi. I sprinkle a granular mycorrhizal product into planting holes before transplanting my peppers, and the fungi form a network of chemotrophic tendrils around the roots, improving nutrient uptake and moisture buffering. Native mycorrhizal species also encourage earthworms to nest nearby, since their nutrient-rich hyphal exudates become a food source for these beneficial invertebrates.
When I switched to microbial inoculants, I noticed fewer instances of Phytophthora blight in my tomatoes—and an uptick in predatory nematodes, which feed on soil-borne insect larvae that could otherwise stress plant roots. Be sure to apply these inoculants at planting time; older garden soils might already harbor beneficial microbes, but adding a diversity boost can tip the balance in your favor. While most commercial strains aren’t invasive, always choose products labeled for vegetable gardens, and avoid introducing unverified exotic microbes, which could upset local soil ecology. By nurturing a robust microbial community, you create natural competition that forces root rot pathogens into the background!
Solar-Powered Drip Irrigation for Precision Watering

Installing a solar-powered drip irrigation system ensures your plants get just enough water—no more, no less—an essential strategy to prevent waterlogged soil. Traditional sprinklers can oversaturate, leaving buried roots vulnerable to rot. I converted my entire vegetable bed to drip lines last summer, powering the pump with a modest solar panel. On sunny days, the system automatically waters in early morning, delivering gentle streams of water right to the root zone without wetting foliage. This precision keeps the soil surface relatively dry, discouraging rot pathogens from colonizing near the crown of plants.
Beyond water control, drip systems also reduce evaporation, which conserves precious water resources and prevents fungal-friendly humidity from building up around the base of plants. I’ve observed that when using drip irrigation, the microclimate under the plant canopy stays significantly drier—benefiting not only the veggies but also helpful ground beetles and predatory rove beetles, which prefer drier conditions to nest and hunt slugs or cutworms. If you live in a region with frequent cloudy spells, a small battery backup might be needed, but solar drip systems can save you hours hauling hoses and reduce your carbon footprint—while keeping root rot at bay!
Mulch Appropriately to Prevent Waterlogging

Mulching is a double-edged sword: done right, it conserves moisture and suppresses weeds; done wrong, it can trap water and promote rot. I learned this the hard way when I piled a two-inch layer of straw around my squash (Cucurbita pepo, native to North America) during a humid July—next thing I knew, vine roots were rotting at the crown. Now, I use a thin layer (1–2 inches) of coarse, well-draining materials—like pine needles (from native pines) or shredded hardwood bark. These mulches shade the soil surface, keeping it cool and preventing heavy rains from compacting the soil, but they still allow excess water to percolate through.
Coarse mulches also encourage earthworms to nest just beneath the surface, as they find shelter under the pine needles or bark. Their tunneling improves drainage, making it harder for root rot pathogens to thrive. Meanwhile, beneficial insects such as ground beetles use mulch as daytime hiding spots before emerging at dusk to feast on soil-dwelling pests. Just be careful not to let mulch touch the base of plant stems—leave a one-inch gap to allow for airflow and prevent moisture from wicking up into the tender tissue, which can invite rot. With the right mulch choice, you strike the balance between moisture conservation and keeping soil aerobic—root rot’s worst nightmare!
Inspect Irrigation and Repair Leaks Promptly

A hidden leak in your irrigation line or a constantly dripping faucet can saturate adjacent soil, creating a hotbed for root rot pathogens. Early one season, I discovered a tiny burst in my soaker hose that had been seeping for days—by the time I fixed it, the soil was pooling with water under my pepper plants, and Pythium had already moved in. Now, I walk the perimeter of my beds every week during the active season, checking hoses and drip lines for pinhole leaks. Even a small puddle beneath a tomato plant can lead to soggy conditions perfect for rot.
On a broader scale, ensure your garden beds sit on a gentle slope (1–2% grade) so that runoff from heavy rain or irrigation doesn’t accumulate around plant bases. If you notice standing water—no matter how slight—use a shovel to create shallow drainage trenches or install perforated drainage pipes leading away from the garden. While digging, you might disturb subterranean nests of beneficial ground bees or beetles; try to relocate the pipe slightly to preserve those habitats. Promptly repairing any irrigation issue not only conserves water and lowers your utility bills but also guards your precious vegetables against the silent creep of root rot!