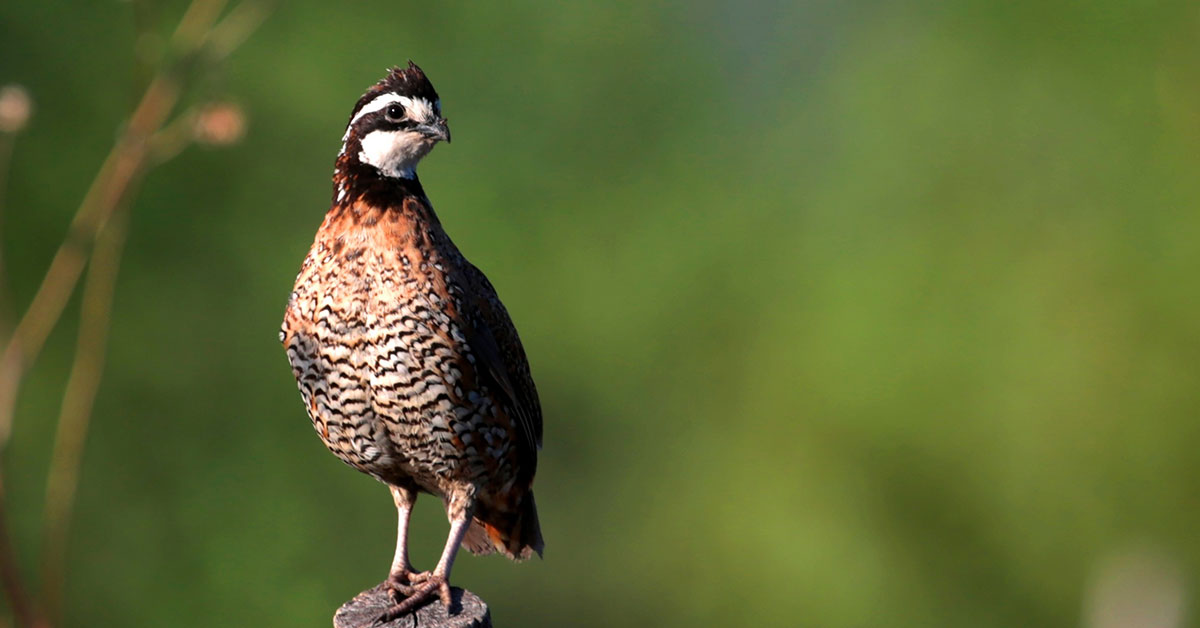

In another article, we talked about how to incubate coturnix quail eggs and some of the advantages of choosing that breed of quail, but they aren’t the only type of domesticated quail commonly kept by quail breeders. Bobwhite quail are another breed commonly kept, but most quail breeders find that they aren’t an optimized bird for egg and meat production. In this article, we’ll talk about the pros and cons of Bobwhite quail and how to incubate Bobwhite quail eggs.
If you’re just getting started and need an incubator, I strongly recommend the Manna Pro Harris Farms Nurture Right Incubator. This is an incubator I personally use for hatching eggs. It has an automatic egg turner suitable for around 30 quail eggs and a full 360-degree view, which is awesome when the eggs start to hatch. If you are looking to hatch more eggs than that, the Hatching Time Cabinet Incubator is pretty much unbeatable. You can incubate as many as 216 quail eggs in this incubator.
Pros and cons of Bobwhite quail
Bobwhite quail have their place in a homestead environment, but if you’re looking to keep a quail that will be good meat and egg layers, they aren’t the bird for you. My recommendation would be to instead keep Coturnix quail. Their eggs and meat are comparable, they’re easier to keep, and they mature fast. If you do decide to proceed with Bobwhite quail, there are some pros and cons to consider.
Pros:
- Bobwhite quail are good flyers (this is perhaps a con unless you’re raising them for sport)
- More weight for meat production
- Ideal for wild release scenarios
- Some report their meat has a better flavor
- Better for training hunting dogs
Cons:
- Bobwhite quail are difficult to raise
- Slower incubation time
- Slower to mature
- Difficult to keep in a flock setting
- Can be more aggressive
Keep reading: Common causes of poor hatch rates
How to incubate Bobwhite quail eggs
If you’re certain you’re ready to proceed with incubating Bobwhite quail eggs, let’s get down to learning how to incubate Bobwhite quail eggs! First, some fast facts about incubating Bobwhite quail:
- Incubation time: 23-24 days
- Incubation temperature: 99.5 degrees Fahrenheit
- Relative humidity: 60 percent
- Lockdown: Day 21
- Lockdown humidity: 75 percent
First, you will need to obtain fertile Bobwhite quail eggs. My recommendation is to always try to source them locally. Shipped fertile quail eggs are more likely to experience internal and external damage and fail to hatch. Eggs sourced locally are much less likely to have this damage. Check local ecommerce sites like Craigslist and Facebook Marketplace to find local quail eggs.
Hatching bobwhite quail eggs
I’ve hatched dozens of batches of eggs in my life. There is some advice online that is spot on and some that is not. Be cautious of reading forums where people discuss egg hatching tips. It really boils down to making sure your fundamentals are rock solid and being patient – allowing nature to take its course. In this section of the article, we’ll go over everything (and I mean everything!) that you need to know about incubating bobwhite quail eggs successfully.
The anatomy of a bobwhite quail egg
Nature knows how to hatch an egg. By providing the basic needs of an egg, heat and humidity, it will likely eventually hatch. But knowing the anatomy of a bobwhite quail egg is important for getting a good hatch rate. The three parts of the egg that you should be very familiar with are the shell, the yolk, and the air sac. Below is an image of the anatomy of an egg:
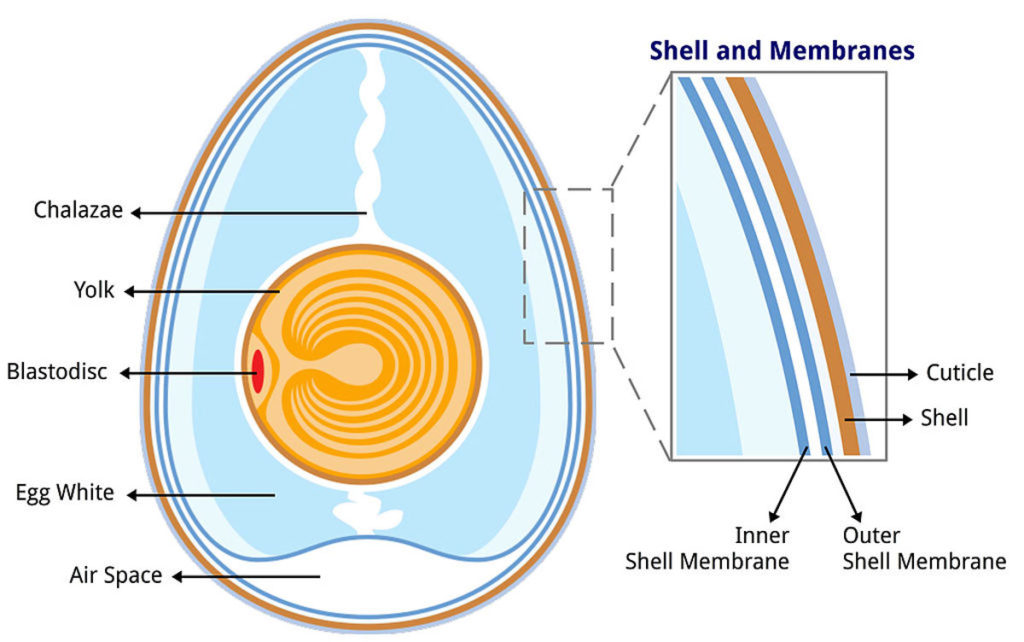
You will need to pay special attention to the quality of the shell, the air space at the fat end of the egg, and the yolk suspended inside of the egg.
Selecting quality eggs to hatch
How do you select a quality bobwhite quail egg to hatch? Where do you get fertile bobwhite quail eggs? Picking the right eggs to hatch is the first and probably most important step in incubating eggs. Fertilied quail eggs aren’t usually sold in markets, and the ones that are sold in the store are usually coturnix quail, not bobwhites. It’s worth advising that you don’t try to incubate supermarket eggs – they probably won’t hatch. Instead, look for a local, trusted seller of fertilized eggs. Find a farm that will allow you to see the flock of bobwhites being bred for eggs. This will ensure that you’re getting what you’re paying for and that the birds are treated well.
You may also purchase fertilized bobwhite quail eggs from the internet. Many hatcheries will gladly ship eggs to you, but it comes at a price. Shipped eggs are expensive, can arrive damaged, and have a reduced hatch rate built-in due to trauma sustained during shipping.
When you have your eggs in hand, carefully examine each egg. Be sure to wash your hands before and after handling the eggs every single time. You may darken a room and candle your eggs by shining a flashlight into the egg. This will reveal any cracks or imperfections inside of the egg.
Never try to incubate an egg that’s cracked, dirty, too large, too small, misshapen, double yolked, or unusual in any way. Also be aware that eggs with a defective air cell should not be incubated. These eggs are likely not viable and will probably not hatch. More on identifying defective eggs later in this article.
Be aware of the rough age of the eggs as well. 7 days after a quail egg is laid, it begins to rapidly lose fertility. Getting your eggs set in the incubator within a week of being laid is vital. After 2-3 weeks, most of your eggs won’t be viable anymore.
Letting your eggs settle
Once you’ve picked up your eggs, whether it’s from your local postal office or from a local farm, you’re going to want to allow your eggs a minimum of 12 hours, though ideally more like 24 hours, to settle. Place them in the carton with the fat side of the egg pointed upward. This will allow the air cell at the fat end of the egg to settle into place before incubating.
Your eggs should be given plenty of time to reach room temperature. Putting colder eggs in an incubator can breed bacteria as the egg heats up. Always start incubating an egg from room temperature.
How to clean an incubator
An incubator that has been contaminated by some kind of pathogen can put a swift end to any developing embryos in the eggs you set. You have to properly clean and sanitize your incubator before setting eggs, even if it’s a new incubator. This is my incubator cleaning protocol – so far it hasn’t steered me wrong.
- If you have used your incubator before, be sure that any pieces of shell or any other material left over from past hatches has been removed from the incubator. These small bits of egg matter can house and grow bacteria.
- Remove all of the removable components, like water pans and egg trays, and clean them with soap, water, and a sponge. After cleaning, you can further disinfect these components by soaking in warm water with a mild bleach. Don’t use chemical cleaners.
- Wipe down each of the components and allow to dry.
- Now, clean the bottom of the incubator by soaking it in a 25% bleach and warm water solution. Wipe it down with a soft cloth, particularly if you use a
- Gently clean the heating unit, but avoid getting it wet. A slightly damp cloth or a brush is the ideal way to clean the heating unit.
Once it’s been cleaned, allow it to sit in a protected spot for 12-24 hours. The incubator should be dry and should smell clean before you set eggs. If it has a funky odor, clean it again using the above protocol.
Setting up your incubator
Once you have your eggs, you will need to set up an incubator. The incubation temperature for Bobwhite quail eggs is 99.5 degrees Fahrenheit. You will need to achieve a humidity level of 60 percent as well. The incubator’s temperature and humidity will need to be stable throughout the first 21 days of incubation. If it gets too hot or too cold, the embryos may die or develop improperly. If the humidity is off for two long, your chicks may suffer a similar fate.
Once you have these two factors established and your incubator is stabilized, you can set your hatching eggs.
Setting Bobwhite quail eggs
Before setting your eggs, take a soft lead pencil and mark an X on one side of the egg and an O on the other. We do this because it helps to properly turn the eggs. Quail eggs will need to be turned a minimum of three times a day to ensure proper embryonic development. Not turning the eggs will potentially steeply reduce hatchability. If you are using an automatic egg turner (which we recommend), there’s no need to mark the eggs.
When your incubator is stabilized and you’re confident that it’s ready, you can set your eggs. If setting in an automatic egg turner, all you need to do is check a few times a day to make sure that temperature and humidity are stabilized.
Candling Bobwhite quail eggs
Partway through the incubation process, usually around day 12-15, you should candle your quail eggs to ensure that each one is developing. Eggs that have not developed may be harboring dangerous bacteria. Bacteria-filled eggs, if left alone long enough, can explode, spreading infected egg material all over your incubator. This can be extraordinarily difficult to clean out of your incubator and it can spread the bacteria to all of the eggs, potentially killing everyone inside. It also tends to smell pretty bad.
It should be pretty apparent which eggs have developed and which have not. Eggs with development will be darker, and you may be able to see movement and veins inside of the egg. Eggs which did not develop will light up and appear clear.
You will also likely have eggs that started developing but quit at some point during incubation. Bobwhite quail eggs are usually white, cream colored eggs and are very easy to candle.
If your chick is alive, at 15 days you should see the embryo, a dark, mostly formless mass, rocking back and forth in the egg. You should also see a network of veins spreading outward from the embryo. The veins may also be in motion. The signs of life should be pretty clear.
If your chick has died, there will be no movement. When an embryo dies, the veins may quickly break down or settle on one side of the egg, leaving only a motionless dark mass inside of the egg. Dead embryos stop growing, which means they will often be smaller than other, live embryos that have incubated the same length of time.
If you aren’t sure, mark the egg with a soft lead pencil and candle again at a later time, maybe the next day or so. Candling is a largely imperfect science and it can sometimes be difficult to tell. A dead egg left for an extra day or two won’t likely hurt anything.
Lockdown
Lockdown is the name given to the final period of egg incubation. You’ll hear it mentioned in articles that cover incubating pretty much any poultry egg. Lockdown is when you stop turning the eggs, increase the humidity, and prepare to…wait. It is during lockdown that you will want to ensure that you have the food and housing necessary to raise your baby Bobwhite quail.
For Bobwhite quail, lockdown starts on day 21 of incubation. During lockdown, you will need to increase the humidity. Your new incubator settings are:
- Temperature: 99.5 degrees Fahrenheit
- Humidity: 75 percent
Increasing the humidity is essential to a healthy hatch. Ensure that your humidity levels are right around 75% before proceeding with lockdown. If the humidity is too low, your chicks may not be able to hatch. If it’s too high, they may have excess fluid inside their eggs and drown in it when they begin breathing.
Once your humidity is stable, remove your eggs from the automatic egg turner (if you are using one.) Otherwise, simply stop turning the eggs.
Between the 21st and 22nd day, your chicks will internally pip. This is the process where your chick will penetrate the air cell of the egg and begin breathing. Between the 22nd and the 23rd day, your quail chicks will likely externally pip, where they crack the outside of the shell and begin breathing outside air.
During this period, the chick will begin absorbing the remaining yolk inside of the egg into their bodies. Chicks will survive on this yolk for a day or so after hatching, at which point they begin to eat and drink.
The general rule of thumb is once you see a pip in the shell, which may appear like a crack or a bump, your chick should hatch within a day or two. As it prepares to hatch from the egg, it will slowly rotate, breaking the egg shell in a process called unzipping. This is the final stage of hatching. Once they have begun to unzip themselves, hatching is imminent. This part can be difficult for excited quail hatchers. It can be slow, but don’t interfere.
Note: If you get impatient and try to help a chick hatch, you may accidentally kill it. If the yolk isn’t fully absorbed and you pull the chick from the shell, this radically increases the odds that the chick will not survive.
The period of time from pip to zip can vary pretty widely. In my experience, once you see an external pip, the chick will fully hatch within 24 hours. The eggs may not all hatch at once. Or they might. It really depends on a number of factors that are nearly impossible to account for. I’ve had hatches where every single egg hatches at the exact same time and some where chicks hatch a few days late. You just have to be patient.
The important thing is to be patient and not mess with the eggs. Hatching eggs can be taxing if you’re emotionally invested. Some eggs won’t pip and hatch. Some will internally pip but not externally pip. Some will externally pip but never unzip. Some will unzip but won’t be able to push out of their shell. Some will fully hatch and then die.
If you think a chick is struggling to hatch, don’t intervene. It sounds callous, but if a chick can’t hatch on its own, it means it wasn’t strong enough to do so. Some chicks are also slow hatchers. Intervening too early can kill them. Let nature take its course.
If you help an chick that can’t hatch on its own, any offspring they have may also be predisposed to having difficulty hatching. This is something to consider if you plan to continue breeding that line of quail.
Common bobwhite quail egg incubation problems
If you’ve gone through the process of incubating bobwhite quail eggs and didn’t get many – or any – quail chicks, I understand that can be a difficult thing to experience. You’ve been incubating your eggs for nearly a month and have little to show for it. Now we troubleshoot. What are the more common causes of poor hatch rates?
- Setting old eggs
- Eggs with low fertility
- Improper turning
- Improper handling
- Uneven incubator temperature
- Uneven incubator humidity
- Nutritional deficiencies with the breeding stock (remember when I suggested meeting the birds?)
- Contaminated incubator