
Incubating duck eggs and witnessing the hatching of adorable ducklings can be an incredibly addictive activity, whether you have a small hobby farm or a large-scale commercial farm. Few things can compare to the excitement of seeing baby ducklings break free from their shells. While hatching duck eggs is not overly complicated, there are crucial factors that must be handled correctly to avoid catastrophic failure. In this article, we will explore the process of incubating duck eggs and discuss proven methods that yield the best hatches.
Before embarking on this journey, it is important to determine the breed of duck you wish to raise. Each breed has its own unique characteristics—some are quieter, while others are noisier; some are more docile, while others tend to be more aggressive. Personally, I recommend the Khaki Campbell duck, which is a medium-sized breed known for its excellent egg-laying capabilities.
Getting the Basics Right: Incubating Duck Eggs
Just as we learn to crawl before we walk and walk before we run, incubating eggs requires grasping the fundamentals before delving into the finer details. So let’s begin with the basics of incubating duck eggs:
- Incubation time: Typically ranges from 19 to 35 days, depending on the breed.
- Incubator temperature: Maintain a steady temperature of 37.5°C (99.5°F).
- Incubator humidity: Aim for a humidity level of 55%, or measure it at 84.5°F using a wet bulb thermometer.
- Egg turning: Rotate the eggs four times a day.
- Candling eggs: Perform candling on the 7th day of incubation.
- Lockdown Date: Varies from day 15 to 32, depending on the breed.
- Lockdown temperature: Reduce the temperature slightly to 37.2°C (99°F) during the final four days of incubation.
- Lockdown humidity: Increase humidity to 65%, or measure it at 88°F using a wet bulb thermometer.
Incubating duck eggs requires patience, as most duck breeds hatch after approximately 28 days of incubation. Muscovy ducks, however, require 32 days or more. It’s important to maintain a consistent incubation temperature of 37.5°C (99.5°F) until four days before hatching. During the last four days, the temperature should be slightly reduced, while the humidity is increased.
Having personally hatched numerous batches of eggs, I can attest that there is both sound and questionable advice available online. Exercise caution when reading tips on egg hatching in online forums. Ultimately, success lies in establishing a solid foundation and patiently allowing nature to take its course. In this section, we will cover every aspect of successfully incubating duck eggs in detail.
Understanding the Egg’s Anatomy
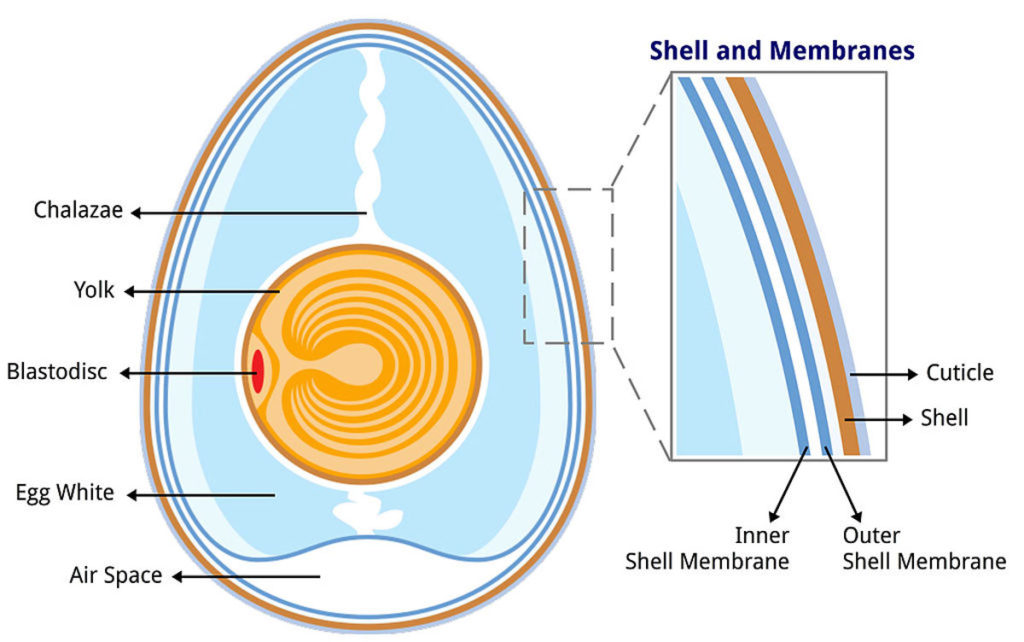
Nature possesses the innate knowledge of how to hatch an egg. By providing the essential elements of heat and humidity, the chances of successful hatching increase significantly. However, understanding the anatomy of a duck egg is vital for achieving a high hatch rate. Familiarize yourself with three key parts of the egg: the shell, the yolk, and the air sac. Refer to the image below for a visual representation:
Pay close attention to the quality of the shell, the air space at the fat end of the egg, and the suspended yolk inside the egg.
Selecting High-Quality Duck Eggs for Incubation
Choosing the right duck eggs to incubate is a critical initial step. Can you rely on eggs from the local market? How do you identify fertile duck eggs? It’s important to avoid attempting to incubate eggs from supermarkets, as they are unlikely to hatch. Instead, seek out a trusted local seller of fertilized eggs. Visit a farm where you can observe the flock of ducks that are bred for egg production. This ensures that you are getting healthy and well-cared-for eggs.
Alternatively, you can purchase fertilized duck eggs online. Many hatcheries offer shipping services, but keep in mind that shipped eggs can be expensive, prone to damage during transit, and may have a reduced hatch rate due to the stress endured during shipping.
When you have the eggs in your possession, carefully inspect each one. Remember to wash your hands before and after handling the eggs every time. To examine the eggs, darken the room and use a flashlight to candle them. This process will reveal any cracks or imperfections inside the eggs.
Never attempt to incubate eggs that are cracked, dirty, too large or too small, misshapen, double-yolked, or exhibit any unusual characteristics. Similarly, eggs with defective air cells should not be incubated, as they are likely non-viable and unlikely to hatch.
Take note of the age of the eggs as well. Duck eggs start to lose fertility rapidly after 7 days of being laid. It is crucial to set your eggs in the incubator within a week of being laid. After 2-3 weeks, most of the duck eggs will no longer be viable.
Allowing Eggs to Settle
After acquiring your eggs from either the local post office or a farm, it is essential to allow them a minimum of 12 hours, preferably 24 hours, to settle. Place the eggs in a carton with the fat end facing upwards. This allows the air cell at the fat end to settle into the correct position before incubation.
Ensure that the eggs reach room temperature before placing them in the incubator. Introducing colder eggs to the incubator can encourage bacterial growth as they warm up. Always start incubating eggs that are at room temperature.
Cleaning and Sanitizing the Incubator
Before placing the eggs in the incubator, it is crucial to clean and sanitize it properly. Incubators provide a hot and humid environment, which is ideal for bacterial growth. To minimize bacterial contamination, a thorough cleaning protocol is necessary.
- If you have used the incubator before, make sure to remove any shell fragments or debris from previous hatches.
- Take out all removable components such as water pans and egg trays, and clean them with soap, water, and a sponge. You can further disinfect these components by soaking them in warm water with a mild bleach solution. Avoid using chemical cleaners.
- Wipe down each component and allow them to dry.
- Clean the bottom of the incubator by soaking it in a 25% bleach and water solution. Gently wipe it down with a soft cloth.
- Clean the heating unit carefully, avoiding wetting it. Use a slightly damp cloth or brush to clean the heating unit effectively.
- Once cleaned, allow the incubator to sit in a protected area for 12-24 hours.
Setting Up the Incubator
Once the incubator has been thoroughly cleaned and sanitized, it’s time to set it up. Avoid the temptation to start the incubator and immediately place the eggs inside. Incubation is not like quickly cooking a frozen pizza in an unpreheated oven! Ensuring that each fundamental aspect of duck egg incubation is precise is crucial. Deviations in temperature can result in egg mortality and disappointment, while incorrect humidity levelscan negatively impact the development and hatching process. Therefore, it’s essential to pay attention to the following readings:
- Incubator temperature: Maintain a constant temperature of 37.5°C (99.5°F).
- Incubator humidity: Aim for a humidity level of 55%, or measure it at 84.5°F using a wet bulb thermometer.
Before setting the eggs, ensure that the incubator has been running stably for at least 12 hours, with consistent temperature and humidity levels. Once you are confident in the stability of the incubator, proceed to place the eggs inside.
Turning the Duck Eggs
In the wild, mother birds continuously rotate and turn their eggs while sitting on them. When incubating duck eggs (or any other poultry eggs), this natural action must be replicated. You can achieve this by manually turning the eggs or using an automatic egg turner. Automatic egg turners are convenient as they minimize the risk of contamination and temperature/humidity fluctuations.
If you don’t have an automatic egg turner, manually turning the eggs by hand is also effective. However, remember to wash your hands thoroughly before handling the eggs to prevent oil, dirt, or bacteria from affecting the eggs. To keep track of which eggs have been turned, use a soft pencil to mark an “X” on one side of the egg and an “O” on the opposite side. This will help ensure that each egg receives proper rotation. Continue turning the eggs daily until four days before the anticipated hatching date.
Candling Duck Eggs
Candling is a fascinating and vital step in the incubation process. To candle a duck egg, darken the room and shine a flashlight into the larger end of the egg. You can create a hole in a piece of cardboard to hold the egg and direct the light. Candling allows you to observe the development inside the egg and identify any potential issues or non-viable eggs. We will delve further into this topic later.
Incubating duck eggs can be an incredibly rewarding experience, but it requires attention to detail and adherence to proper procedures. By following these guidelines and ensuring the essential elements of temperature, humidity, and egg turning are correctly managed, you increase your chances of a successful hatch.