
If you’ve got a fallen tree, a section of old log, or even a fat piece of firewood sitting around, you have the raw materials for one of the most genuinely attractive planters you can put in a garden. Log planters look like they belong — because they do. They’re also absurdly simple to make, which is a nice bonus.
The idea gets dismissed by some gardeners as a rustic Pinterest project, which is a little unfair. Done right, a log planter is a legitimate garden feature that can look at home in a formal perennial border, a woodland corner, or a cottage-style bed. Done wrong, it’s a soggy mess of rotting wood and sad-looking impatiens. The difference is mostly in the wood choice, the drainage, and what you put in it.
Here’s how to do it properly.
What You Need
The project is simple enough that the supply list is short. The main decision is the log itself — everything else follows from that.
The log: Look for something with a diameter of at least 8 to 10 inches so there’s enough interior space to actually plant in. Hardwoods like oak, maple, and cherry rot more slowly than softwoods, giving you several more years of planting life. Avoid any wood that smells strongly of decay or has soft, punky spots — it’ll fall apart in a season. A log that’s already partially hollow is a gift; you’re doing half the work already.
Tools:
- A chainsaw, reciprocating saw, or large drill with a 1–2 inch spade or auger bit
- Chisel and mallet (if hollowing by hand)
- Drill for drainage holes
Soil: Don’t use straight garden soil — it compacts badly in a confined space and drains poorly. A mix of quality potting soil with added perlite (about 1 part perlite to 3 parts potting mix) keeps things light and draining well.
How to Make a Log Planter: Step by Step
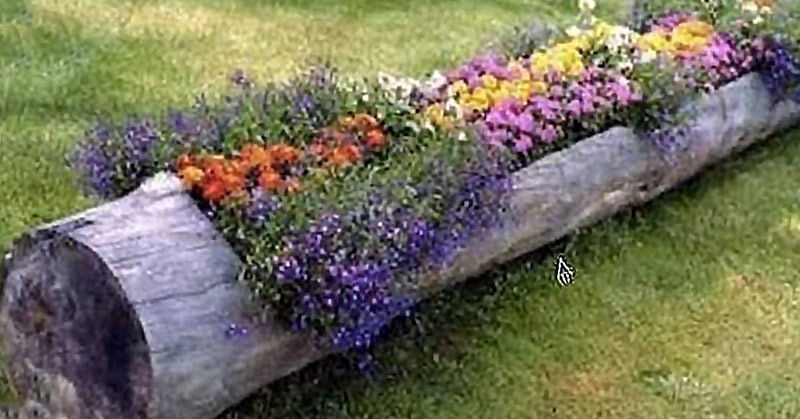
1. Choose your orientation. You can stand the log upright (like a stump) or lay it on its side. Upright logs become dramatic focal point planters. Horizontal logs look more naturalistic and work well along a path or as edging. Each needs a slightly different hollowing approach.
2. Hollow out the interior. This is the main work. For a standing log, use a drill with a large auger or spade bit to bore multiple overlapping holes into the top, then clean out the wood between them with a chisel and mallet. You’re aiming for a cavity about 6 to 8 inches deep and as wide as the log diameter allows, leaving at least 2 inches of wall thickness so the log stays structurally sound.
For a horizontal log, cut or drill out a trough along the top. Some people use a chainsaw to make two parallel cuts and then chisel out the wood between them — this is fast and effective if you’re comfortable with the tool.
3. Drill drainage holes. This is non-negotiable. Without drainage, your planting cavity becomes a swamp and roots will rot. Drill several 1-inch holes into the bottom of the cavity — three to five holes for most logs. If the log is sitting directly on soil, raise it slightly on small stones or wooden shims to keep those drainage holes from getting blocked.
4. Add a layer of gravel or bark. Before adding soil, put an inch or two of coarse gravel or broken bark at the bottom of the cavity. This prevents soil from washing out through the drainage holes and helps keep things aerated.
5. Fill with soil and plant. Fill with your potting mix blend, leaving about an inch of space at the top. Plant your chosen plants, water thoroughly, and you’re done.
What to Plant in a Log Planter
The choice depends on how much sun the location gets and what look you’re after. A few guiding principles: shallow-rooted plants work better than deep-rooted ones, and plants that prefer consistent moisture (rather than wet-dry extremes) tend to thrive in the contained environment.
For sun:
- Sedum (stonecrop) — practically made for log planters. Drought-tolerant, low-growing, and they spill beautifully over the edges. They look like they’ve always been there.
- Thyme — fragrant, low-growing, loves the drainage
- Portulaca — heat and drought-tolerant, brilliant color, almost impossible to kill
- Zinnias or marigolds — cheerful and long-blooming if you want seasonal annuals
For shade or partial shade:
- Hostas — dramatic foliage, excellent for a woodland log planter
- Ferns — fiddlehead and Japanese painted fern both look stunning emerging from a mossy log
- Coral bells (Heuchera) — colorful foliage that lasts all season
- Impatiens — if you want flowering color in a shaded spot
For a wider selection of plants that do well in contained growing situations, our guide to flowers perfect for container gardens covers a lot of the same territory, and herbs that thrive in containers is worth reading if you want a culinary log planter near the kitchen door.
For a shaded woodland log planter, shade-loving groundcovers can give you planting ideas that carry the aesthetic naturally into the surrounding garden.
How Long Will a Log Planter Last?
This is the honest part. Log planters are not permanent. Even with hardwood, expect 3 to 7 years before the log breaks down significantly — and that timeline depends heavily on your climate. Wet climates accelerate rot considerably. In drier climates, a well-chosen hardwood log can hold up for a decade.
According to the RHS, decaying wood actually has significant ecological value — it supports fungi, invertebrates, and beneficial insects as it breaks down. So a log planter isn’t just a garden ornament; it becomes a small habitat over time. When it finally starts to collapse, you can let it decompose naturally in a corner of the garden and let the wildlife finish the job.
You can slow the decay slightly by lining the interior of the planting cavity with a piece of landscape fabric or burlap before adding soil — this keeps the moisture concentrated in the soil rather than saturating the wood walls. Don’t line the drainage holes.
A Few Things That Go Wrong
The most common mistake is using a log that’s already too far gone. If the wood is soft enough to push your finger into, it’s not going to last a season as a planter. Pick up your candidate log and give it a squeeze — it should feel solid throughout.
The second most common mistake is skipping drainage. A waterlogged log planter smells bad, grows mold, and kills plants. Drill the holes before you fill with soil, not after.
Finally, don’t overfill with giant plants. The shallow soil depth and limited root space favor compact, shallow-rooted plants over anything that wants to spread deep. Match plant size to log size and you’ll save yourself replanting headaches by midsummer.
Making Your Log Planter
Pick up the log, find a drill, and spend an afternoon on it. A log planter is one of those projects that takes a few hours of actual work and then sits in your garden looking like it took real effort. For the cost of a bag of potting mix and an afternoon outside, you’ll have a planter that gets more comments than anything you’ve bought from a garden center.
If you’re planning a woodland or naturalistic corner of the garden, plants that grow well under trees can guide the rest of the planting around your new log planter and tie the whole area together.
FAQ
What kind of log is best for a log planter? Hardwoods — oak, maple, cherry, black locust — last the longest because they rot more slowly. Avoid softwoods like pine or poplar if longevity matters. The log should feel solid throughout; soft or punky wood won’t survive more than a season.
How deep should I hollow out the log? Aim for 6 to 8 inches of depth, leaving at least 2 inches of wall on all sides. Most plants don’t need more than 6 inches of root depth, and going deeper unnecessarily weakens the log’s structure.
Do I need to treat the wood to prevent rot? You can, but it’s not necessary and some treatments may leach chemicals into the soil. The better approach is choosing rot-resistant wood to begin with and ensuring good drainage so moisture doesn’t sit against the wood walls constantly.
Can I make a log planter without a chainsaw? Yes — a large drill with an auger or spade bit does most of the work. Drill overlapping holes and clean out the material between them with a chisel. It takes more time but works well on smaller logs.
How often do I need to water a log planter? More frequently than a large container, because the soil volume is limited and wood wicks some moisture. Check the soil an inch or two down — if it’s dry, water thoroughly. In summer heat, that may mean every day or two.
Can I leave a log planter outside in winter? Generally yes, though the freeze-thaw cycle will accelerate wood breakdown. In very cold climates, emptying the planter of soil for winter and storing it in a dry place extends its life considerably.