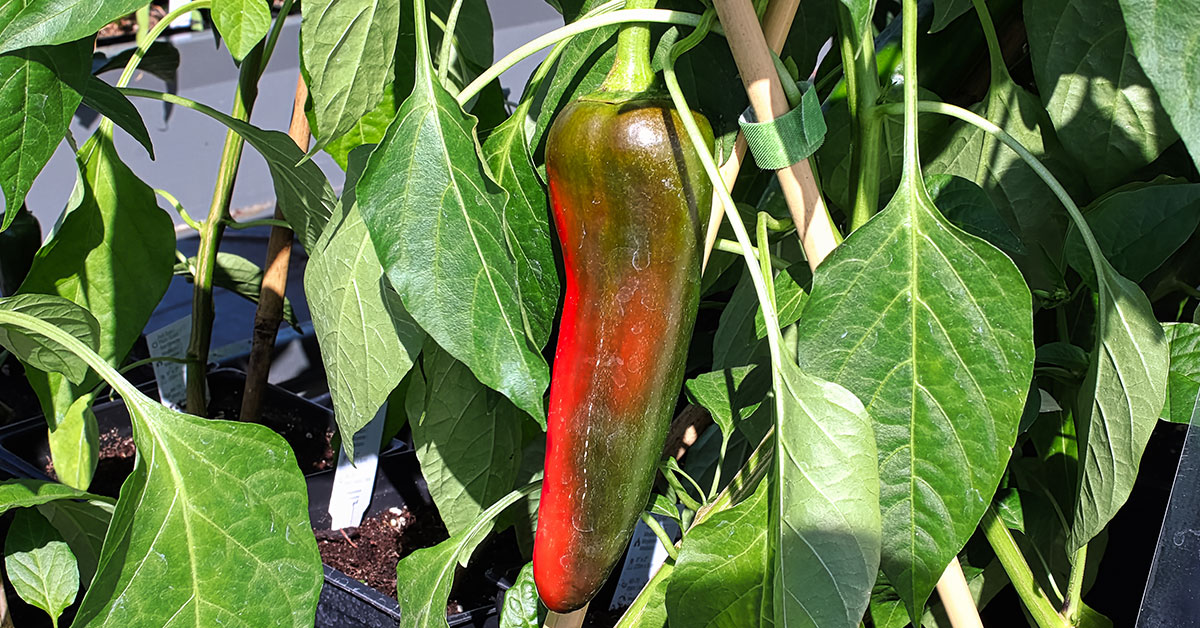

The Anaheim pepper plant, also known as the New Mexico pepper or the California chili, is a popular variety of chili pepper that is commonly grown in the southwestern United States. This pepper plant is known for its mild to medium heat level and is often used in dishes such as chilies, salsas, and roasted peppers.
Anaheim pepper plants are relatively easy to grow and maintain, making them a great option for both novice and experienced gardeners. In this blog post, we will discuss everything you need to know about growing and caring for Anaheim pepper plants.
What are Anaheim peppers?
Anaheim pepper plants are a type of chili pepper that originated in New Mexico. They are a popular variety of pepper due to their mild to medium heat and versatility in cooking. The pepper got its name from the city of Anaheim, California, where it was first grown commercially in the early 1900s.
Anaheim pepper plants can grow up to 2-3 feet tall and produce long, tapered peppers that range in color from green to red. They are typically harvested when they are green or just starting to turn red. As the pepper matures and turns red, it becomes sweeter and less spicy.
Anaheim peppers are commonly used in Mexican and Southwestern cuisine, but they can also be used in a variety of other dishes. They are often roasted, grilled, or stuffed, and used in everything from sauces and salsas to soups and stews. The mild heat of the pepper makes it a great addition to dishes where you want to add a little bit of spice without overwhelming the other flavors.
Overall, the Anaheim pepper plant is a great addition to any garden or patio. They are easy to grow and produce a bountiful harvest. Plus, they add a delicious and unique flavor to a variety of dishes.
What does an Anaheim pepper taste like?
Anaheim pepper plant is a variety of chili pepper that is commonly grown in the United States. These peppers are long and slender, with a mild to medium level of heat. But what exactly do they taste like?
Anaheim peppers are known for their slightly sweet and smoky flavor. They have a mild heat that is more subtle than other chili peppers, which makes them a popular choice for those who want to add some spice to their dishes without overwhelming their taste buds.
When cooked, Anaheim peppers develop a rich, earthy flavor that pairs well with a variety of ingredients. They are often used in Mexican, Southwestern, and Tex-Mex cuisine, and are a common ingredient in dishes like chiles rellenos, enchiladas, and tacos.
Overall, the taste of Anaheim pepper plant can be described as versatile, mild and slightly sweet. It is a great addition to any recipe that requires a little bit of heat and a lot of flavor.
How to grow Anaheim Pepper seeds
Anaheim peppers are one of the most popular types of chili peppers, known for their mild to medium heat and versatile flavor. If you want to grow Anaheim peppers in your garden, starting the plant from seeds is an easy and cost-effective way to do so. Here’s how to start Anaheim pepper plant from seed:
- Choose a good quality seed: Start by choosing a good quality Anaheim pepper seed. You can buy seeds from a local nursery or online. Make sure the seeds are fresh and have a high germination rate.
- Start indoors: Anaheim peppers need a warm temperature and plenty of sunlight to germinate. Start the seeds indoors, 6-8 weeks before the last frost date in your area. Use a seed-starting tray or small pots filled with a good quality seed-starting mix.
- Plant the seeds: Plant the seeds about ¼ inch deep in the soil and cover them lightly with soil. Water the soil thoroughly but be careful not to overwater as the seeds can rot.
- Provide warmth and light: Anaheim pepper seeds need warmth and light to germinate. Keep the seed tray in a warm location, ideally between 70-80°F. Use a grow light or place the seed tray near a bright window to provide the necessary light.
- Water regularly: Keep the soil moist but not soggy. Water the seeds regularly, but do not let the soil dry out completely.
- Transplant outdoors: Once the seedlings have grown to about 3-4 inches tall and have developed a few leaves, they are ready to be transplanted outdoors. Choose a sunny spot with well-draining soil. Harden off the seedlings by gradually exposing them to outdoor conditions over a period of 1-2 weeks.
- Care for the plant: Once the plants are transplanted, water them regularly and fertilize them with a balanced fertilizer every 4-6 weeks. Pinch off the first set of flowers to encourage the plant to focus on growing leaves and stems.
With these simple steps, you can easily grow Anaheim pepper plants from seed and enjoy a bountiful harvest of delicious and versatile peppers.
Anaheim Pepper growing guide
Anaheim pepper plants are a type of chili pepper that originates from New Mexico. These plants are known for their mild to medium heat and are a popular ingredient in Mexican and Southwestern cuisine. If you’re interested in growing Anaheim pepper plants yourself, here are some tips to get you started.
- Choose the Right Location: Anaheim pepper plants require a lot of sunlight, so it’s important to choose a location that gets at least six hours of direct sunlight each day. They also need well-draining soil, so make sure the soil in your chosen location isn’t too heavy or clay-like.
- Planting: Anaheim pepper plants can be started from seeds or seedlings. If starting from seeds, sow them indoors about eight weeks before the last frost date in your area. Once the seedlings have grown to about 3 inches tall, they can be transplanted into your garden. If starting from seedlings, plant them directly in your garden after the last frost date.
- Watering: Anaheim pepper plants need consistent watering, but be careful not to overwater them. The soil should be moist but not waterlogged. Water your plants deeply once a week, or more often if the weather is particularly hot or dry.
- Fertilizing: Fertilize your Anaheim pepper plants once a month with a balanced fertilizer. This will help promote healthy growth and ensure a good crop.
- Harvesting: Anaheim peppers can be harvested when they are green or left to ripen to a red color. To harvest, simply twist or cut the pepper from the plant. Be sure to wear gloves when harvesting and handling the peppers, as they can cause skin irritation.
By following these tips, you can successfully grow Anaheim pepper plants in your own garden. With a little care and attention, you’ll be enjoying fresh, homegrown peppers in no time!
Harvesting
Anaheim pepper plants are a popular choice for gardeners who want to grow peppers at home. These plants produce mild to moderately hot peppers that are great for cooking or adding flavor to your favorite dishes. However, many gardeners are unsure of when and how to harvest Anaheim pepper plants.
When to Harvest Anaheim Peppers
Anaheim pepper plants typically take 70 to 80 days to reach maturity. The peppers will start to turn from green to red when they are mature, but you can also harvest them when they are still green if you prefer a milder taste. It’s important to wait until the peppers are fully grown before harvesting them to ensure that they are at their peak flavor.
How to Harvest Anaheim Peppers
To harvest Anaheim pepper plants, you will need a pair of gardening gloves and a sharp pair of scissors or pruning shears. Begin by inspecting the peppers to make sure they are fully grown and have turned the desired color. Then, carefully grasp the pepper with one hand and use the scissors or pruning shears to cut the stem about 1/4 inch above the pepper.
It’s important not to pull the peppers off the plant as this can damage the plant and reduce future yields. Instead, use the scissors or pruning shears to cut the stem cleanly and neatly.
After harvesting the peppers, you can store them in the refrigerator for up to two weeks or freeze them for later use. Anaheim peppers can be used in a variety of dishes, including salsas, stews, and stir-fries.
In conclusion, harvesting Anaheim pepper plants is a simple process that requires a little patience and attention to detail. By waiting until the peppers are fully grown and using the right tools to harvest them, you can ensure that your peppers are at their peak flavor and quality.
Common problems
Peppers are generally resilient plants, but they can encounter a few issues during the growing season. Understanding these common problems and their solutions can help you maintain healthy pepper plants and maximize your harvest. Here’s an overview of some common issues and how to fix them:
- Poor or Slow Germination: If you’re experiencing low germination rates or slow germination, check the freshness and quality of your seeds. Using fresh, high-quality seeds can improve germination. Maintain consistent soil moisture by watering lightly and frequently, without overwatering. Providing optimal temperature conditions for germination, typically around 75-85°F (24-29°C), can also enhance germination rates.
- Insufficient Sunlight: Peppers thrive in full sunlight, so inadequate light can result in weak plants and reduced yields. Ensure your pepper plants receive at least 6-8 hours of direct sunlight each day. If growing indoors, consider using reflective mulch or supplemental grow lights to provide sufficient light intensity.
- Inadequate Watering: Proper watering is crucial for pepper plants. Water deeply and consistently, aiming to keep the soil evenly moist. Avoid overwatering, which can lead to root rot, and underwatering, which can cause stress and stunted growth. Applying mulch around the base of plants can help retain moisture and regulate soil temperature.
- Nutrient Deficiencies: Nutrient imbalances can manifest as yellowing leaves, poor growth, or reduced fruiting. Test your soil to identify any nutrient deficiencies and address them accordingly. Use organic or balanced fertilizers to provide essential nutrients. Pay attention to phosphorus, potassium, and nitrogen, which are crucial for healthy plant growth. Incorporating organic matter into the soil before planting can also improve nutrient content.
- Pests and Diseases: Common pests like aphids, spider mites, or caterpillars can attack pepper plants, while diseases like bacterial spot or fungal infections can occur. Regularly inspect plants for signs of pest infestation or disease. Use organic pest control methods such as insecticidal soaps or neem oil if necessary. Promote good airflow by spacing plants adequately and avoid overhead watering, as moisture on leaves can contribute to disease development. Practicing crop rotation can also help prevent the buildup of pests and diseases in the soil.
- Blossom End Rot: Blossom end rot appears as a dark, sunken spot at the bottom of the fruit. It is caused by calcium deficiency or irregular moisture levels. To prevent blossom end rot, maintain consistent soil moisture by watering evenly and deeply. Mulching around the plants can help regulate moisture levels and prevent rapid drying of the soil.
- Poor Fruit Set: If your pepper plants are not producing many fruits, poor pollination might be the issue. Encourage pollinators, such as bees, by planting companion flowers and avoiding the use of pesticides harmful to beneficial insects. You can also gently shake the plants to help disperse pollen or use a small paintbrush to manually transfer pollen from flower to flower.
By being proactive and addressing these common problems, you can ensure healthy and productive pepper plants in your garden. With proper care, you’ll be rewarded with an abundant harvest of flavorful peppers to enjoy in your favorite dishes.