
Growing iris bulbs in Florida is a rewarding experience, thanks to the state’s warm climate and long growing season. In general, irises are best suited to growing in zones 8, 9, 10, and 11.
While some species can tolerate colder zones, they may struggle to survive if temperatures fall below 10 degrees Fahrenheit.
In Florida, iris bulbs should be planted in the early fall, prior to the first frost. Plant the bulbs two to three inches deep in well-drained, rich soil that is slightly acidic, and water thoroughly after planting.
It is important to ensure that the soil remains consistently moist in order for the bulbs to thrive. Fertilize the soil with a balanced fertilizer when active growth begins in spring and water as necessary to keep the soil damp but not soggy.
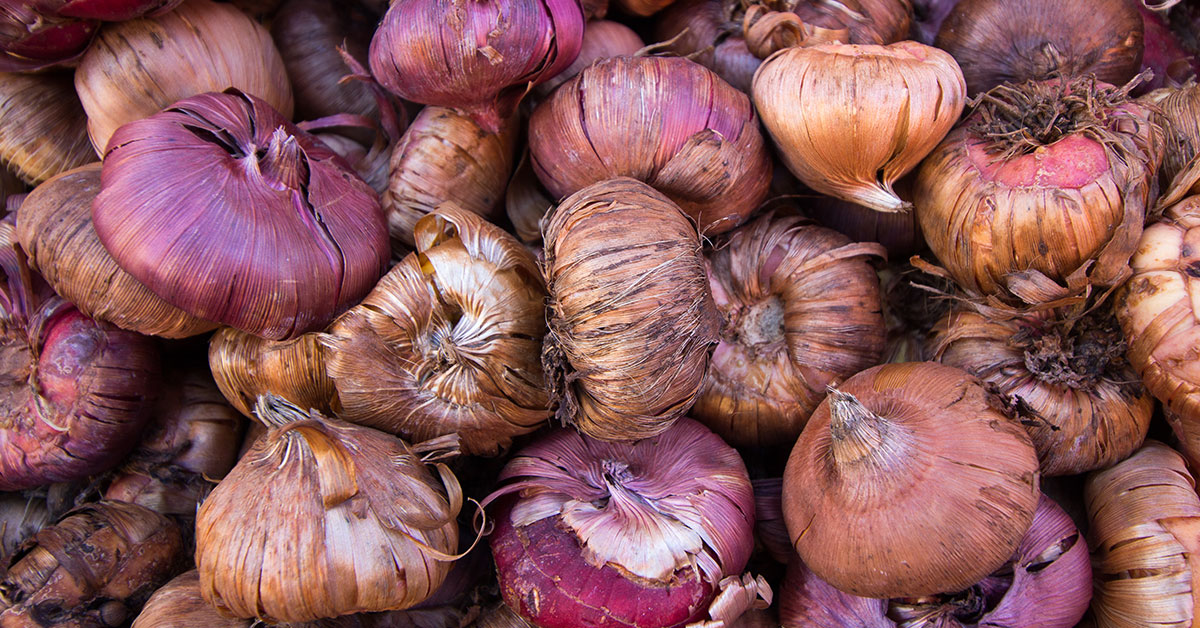
Different varieties of irises
Selecting different varieties of irises for your garden offers several benefits. Firstly, it adds a vibrant array of colors and textures to your landscape, creating visual interest and a dynamic display of blooms. By choosing a diverse range of iris varieties, you can extend the blooming season and enjoy their beauty for a longer period.
Different iris varieties also come with varying growth habits, heights, and foliage characteristics, allowing you to create depth and dimension in your garden design. Additionally, selecting various iris types can attract pollinators such as bees and butterflies, contributing to a more biodiverse and ecologically balanced garden.
Lastly, exploring different iris varieties opens up a world of horticultural possibilities, enabling you to discover new favorites and engage in the excitement of collecting and growing these captivating flowers.
- Bearded Iris (Iris germanica): This popular iris variety features a distinctive “beard” of fuzzy hairs on the lower petals. It comes in a wide range of colors, including purple, white, yellow, pink, and blue. Bearded irises often display multiple ruffled petals, creating a showy and elegant look.
- Siberian Iris (Iris sibirica): Siberian irises have slender, upright foliage and delicate flowers. They typically bloom in shades of purple, blue, and white, with intricate markings on the petals. Siberian irises are known for their graceful appearance and are well-suited for border plantings or alongside water features.
- Japanese Iris (Iris ensata): Japanese irises are renowned for their large and striking blooms. They feature broad, flat petals in shades of purple, pink, white, and blue. Japanese irises often have intricate patterns and markings, and their flowers can reach impressive sizes, making them a captivating addition to any garden.
- Dutch Iris (Iris x hollandica): Dutch irises are characterized by their tall, slender stems and elegant blooms. They come in a wide array of vibrant colors, including purple, yellow, orange, white, and bi-colors. Dutch irises have distinctively shaped flowers with upright petals and often feature contrasting markings.
- Louisiana Iris (Iris brevicaulis): Louisiana irises are native to the southeastern United States and are well-suited for wetland or boggy areas. They produce large, flat flowers in shades of purple, blue, white, and yellow. Louisiana irises have broad, sword-like leaves and are valued for their ability to thrive in moist conditions.
- Crested Iris (Iris cristata): Crested irises are petite and charming, with dainty blooms. They feature pale blue or lavender petals with a central crest of darker color, resembling a small butterfly. Crested irises are perfect for rock gardens, woodland areas, or as a ground cover.
- Spuria Iris (Iris spuria): Spuria irises are known for their tall and slender stems, reaching up to 3 to 4 feet in height. They produce clusters of delicate flowers in various colors, such as purple, yellow, white, and pink. Spuria irises are ideal for adding vertical interest to garden borders or mixed perennial beds.
These are just a few examples of the many beautiful iris varieties available. Each variety offers unique characteristics and stunning blooms, allowing you to create a diverse and captivating iris collection in your garden.
When to plant iris bulbs in Florida
Iris bulbs are typically planted in early fall., It’s generally best to plant iris bulbs about 6 to 8 weeks before the ground freezes in your area. In Florida, you should aim to plant your iris bulbs around:
This timing allows the bulbs to establish their root systems before the onset of winter and ensures they are ready to bloom in the following spring. Planting at this time also allows the bulbs to benefit from the cooler temperatures and ample moisture of the fall season.
However, it’s always a good idea to check with local gardening resources or consult a gardening expert in your area for more precise planting dates based on your specific location.
How to plant iris bulbs in Florida
Planting iris bulbs in Florida is a pretty easy and straightforward process. Start by selecting a suitable location in your garden. Irises thrive in areas that receive full sun or at least six hours of direct sunlight per day. Ensure the soil is well-draining to prevent waterlogging and bulb rot.
Before planting, prepare the soil by removing any weeds or debris and loosening it with a garden fork or tiller. If the soil is heavy or clayey, amend it with organic matter like compost or well-rotted manure to improve drainage and fertility.
Next, dig a hole that is wide and deep enough to accommodate the iris bulb. The depth should be such that the top of the bulb sits just below the soil surface. Gently place the bulb in the hole, with the pointed end facing upward. Spread the roots out in a natural manner and cover them with soil, ensuring that the bulb is firmly planted.
Space the iris bulbs according to their variety and their eventual size. Typically, bulbs are placed about 12 to 18 inches apart, allowing enough room for the plants to grow and spread. If you are planting multiple irises, arrange them in groups or clusters for a more visually appealing display.
After planting, water the bulbs thoroughly to settle the soil and promote root establishment. Provide regular watering during the first few weeks, keeping the soil moist but not waterlogged. Once established, irises are relatively drought-tolerant and can withstand periods of dryness.
It’s essential to monitor the plants for any signs of pests or diseases. If detected, take appropriate measures to address the issue promptly. Additionally, consider applying a layer of organic mulch around the plants to help conserve moisture, suppress weed growth, and insulate the bulbs during winter.
Iris care
Knowing how to care for irises is important for several reasons. First and foremost, proper care ensures the health and vitality of these beautiful flowers. By providing the right conditions, such as adequate sunlight, well-draining soil, and appropriate watering, irises can thrive and produce abundant blooms.
- Watering:
- Initial watering: After planting the irises, give them a thorough watering to settle the soil around the roots.
- Regular watering: During the growing season, irises require about 1 inch of water per week. Water deeply but infrequently, allowing the soil to dry out slightly between waterings. Avoid overwatering, as irises are susceptible to root rot in soggy conditions.
- Mulching:
- Mulch application: Apply a layer of organic mulch, such as straw or wood chips, around the base of the iris plants. This helps retain moisture, suppress weed growth, and regulate soil temperature.
- Mulch depth: Spread the mulch to a depth of 2 to 3 inches, ensuring it does not come in direct contact with the rhizomes.
- Fertilizing:
- Timing: Fertilize irises in early spring before the new growth emerges and again after flowering.
- Fertilizer selection: Use a balanced, slow-release fertilizer with an NPK ratio of around 10-10-10 or similar. Follow the instructions on the fertilizer package for proper application rates.
- Application method: Sprinkle the fertilizer evenly around the plants, avoiding direct contact with the rhizomes. Water the area thoroughly after application.
- Deadheading and Pruning:
- Deadheading: Remove spent blooms by cutting the flowering stem down to the base of the plant. This promotes a neater appearance and encourages the plant to put more energy into producing new blooms.
- Pruning: In late fall or early winter, trim back the foliage to about 6 inches above the ground. This helps prevent disease and allows the plant to focus on root development during the dormant period.
- Pest and Disease Control:
- Inspection: Regularly inspect the leaves and rhizomes for signs of pests or diseases such as iris borers, aphids, or fungal infections.
- Treatment: If pests or diseases are detected, consult with your local garden center or extension service to determine the most appropriate treatment options, which may include insecticides or fungicides.
- Division and Transplanting:
- Division timing: Every three to five years, irises may become overcrowded and require division. The best time for division is a few weeks after blooming has finished.
- Division process: Dig up the entire clump, carefully separate the rhizomes, and trim the leaves to about 6 inches. Replant the divisions at the appropriate depth in a new location or share them with friends.
Remember to always monitor your irises for any signs of stress or problems, and promptly address them to ensure healthy and vibrant plants. With proper care, your irises will reward you with their stunning blooms year after year.