
If you’ve ever looked at a pile of fallen logs in the corner of your yard and thought “I really should do something with that,” hugelkultur might be the most satisfying answer you’ll find. It takes what most gardeners treat as a disposal problem — downed wood, branches, garden debris — and buries it at the heart of a productive garden bed.
The idea is simple, the results take patience, and the long-term payoff is a genuinely low-maintenance growing space that improves every year as the wood below decomposes. It’s also, refreshingly, something that doesn’t require buying much of anything. That combination is rarer than it sounds.
What Is Hugelkultur?
Hugelkultur (pronounced hyoo-gul-kul-tur) is a German term meaning “hill culture” or “mound culture.” It’s a gardening method that has been practiced in Germany and Eastern Europe for centuries, built around burying logs and woody debris under a raised mound of soil and organic material. According to Oklahoma State University Extension, a well-built hugelkultur is a self-watering, self-composting raised garden with minimal irrigation and fertilization needs once established.
The wood core acts like a slow-release sponge. As it decomposes, it absorbs and retains water, releases nutrients into the surrounding soil, creates air pockets that aerate roots without tilling, and generates a small amount of heat from microbial activity that can extend your growing season slightly in the first few years.
That’s the promise. The reality involves a few tradeoffs worth knowing upfront.
How Hugelkultur Actually Works
Think of it as a raised bed with a buried compost system inside. The logs and branches at the core break down over years — not weeks — and the decomposition process is dominated by fungi, which are more efficient with nitrogen than the bacteria-heavy breakdown that happens when you till wood chips into topsoil. The air pockets created by logs settling and shrinking give roots a loose, well-aerated environment to grow into over time.
The water retention piece is the headline claim, and it holds up. As wood decomposes, it becomes increasingly porous and sponge-like, wicking and holding moisture. Established hugelkultur beds — after a few years of decomposition — genuinely reduce how much supplemental watering they need.
One honest caveat: the first year or two can be rough if you’re using fresh wood. Fresh logs tie up nitrogen as the decomposition process kicks off, which can leave heavy-feeding plants looking pale and stunted. The fix is to either use older, partially rotted wood, or to add enough nitrogen-rich material (compost, manure, grass clippings) in the upper layers to compensate. OSU Extension recommends planting legumes like peas in the first season to fix nitrogen without synthetic fertilizer — smart advice that also gives you something to eat.
What Wood to Use (and What to Avoid)
Almost any wood works, with a couple of exceptions. Avoid cedar and black walnut — both have allelopathic compounds that can inhibit plant growth. Fresh logs work, old rotted logs work even better. Branches, sticks, and prunings are all fair game and can be layered throughout.
The bigger the wood pieces, the slower they break down and the longer the water-retention benefits last. A bed built with large logs will still be actively decomposing a decade from now. A bed built primarily with small branches and sticks will be much closer to finished compost in three or four years.
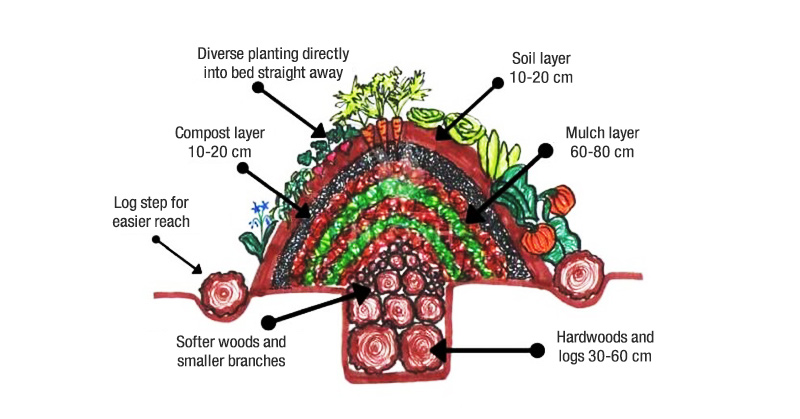
Building a Hugelkultur Bed
You don’t need a mound five feet tall. In fact, a more modest approach — especially in a suburban yard — tends to work better socially and practically. A bed 18 to 24 inches tall is a good starting point. You can always add compost each year to slowly build it up.
Here’s the basic layering process:
- Mark your footprint. A standard hugelkultur bed is roughly 3 feet wide by 6 feet long, though you can adapt freely to your space. Wider than 4 feet becomes hard to reach the center without stepping in.
- Optional: dig a shallow trench. Sinking the base 6 to 12 inches into the ground lowers the final height and helps the bed capture rainwater from the surrounding area. Good for both drainage management and keeping the mound visually lower-profile.
- Lay the logs. The largest pieces go on the bottom. This is your core — old, partially rotted logs are ideal. Logs from deciduous trees are best.
- Add branches and sticks. Fill gaps with progressively smaller wood, branches, and twigs.
- Layer green nitrogen-rich material. Grass clippings, kitchen scraps, manure, or fresh plant cuttings go over the wood. This counteracts the nitrogen draw from decomposition and feeds the microbial activity that gets things moving.
- Add compost and topsoil. Several inches of good compost, then a top layer of topsoil or a quality growing mix. The soil depth above the wood should be at least as deep as the wood base below.
- Water it in well. The wood needs to be moist to begin decomposing.
If you can build in fall and plant in spring, the bed will have time to settle and begin active decomposition before you ask it to support plants. That said, you can plant immediately if needed — just plant legumes or lighter feeders that first season and save your heavy nitrogen feeders like tomatoes and corn for year two when things are better established.
What to Plant and When
Most vegetables do well in an established hugelkultur bed. The mound’s varied slopes create useful microclimates — the south-facing side warms faster and stays drier, good for heat-loving crops like tomatoes and peppers. The north-facing slope stays cooler and shadier, better suited for lettuce, spinach, or herbs.
The top of the mound, with the best drainage, suits drought-tolerant crops well. The base of the mound, where moisture accumulates, handles thirstier plants.
In the first year with fresh wood, skip the heavy nitrogen feeders and lean on:
- Peas, beans, and other legumes (nitrogen-fixers)
- Squash and zucchini (vigorous growers that tolerate variable fertility)
- Salad greens and herbs
From year two onward, you can grow most things you’d grow in a raised bed. Tomatoes, peppers, cucumbers, and brassicas all do well once nitrogen levels have stabilized.
The Honest Tradeoffs
Hugelkultur isn’t magic, and a few of the bolder claims deserve some tempering.
It won’t eliminate watering. An established bed holds moisture better than flat ground, but in a genuine dry spell, you still need to water. The benefit is meaningful, not absolute.
The first year is often the hardest. Nitrogen drawdown is real if you use fresh wood, and some gardeners find the settling mound an awkward shape to manage initially. Patience and a nitrogen supplement (or legume cover crop) get you through it.
Research is limited. There’s a reasonable body of traditional practice here, but the controlled scientific research is thin. Most of what’s known comes from small-scale studies and practitioner experience rather than large trials. The outcomes are real but the mechanisms aren’t exhaustively documented.
What is well-documented is that wood buried in soil retains moisture as it decomposes, and that decomposing organic matter improves soil fertility over time. That’s the foundation, and it holds.
Is Hugelkultur Worth Building?
If you have a fallen tree, storm debris, wood from pruning, or branches you’d otherwise be hauling away — yes, absolutely. Building a hugelkultur bed turns disposal work into a productive garden, costs almost nothing in materials, and improves reliably over years.
If you don’t have a ready supply of wood and would have to buy materials, a conventional raised bed with good soil and regular compost additions will likely give you faster, more predictable results in the short term.
If you’re interested in no-till, low-input gardening and have the patience to let a system develop over two to three seasons, hugelkultur beds are genuinely worth the effort. For the right gardener with the right materials, they’re an elegant solution.
Start with a small bed — 3 by 6 feet — in a spot with decent sun, use whatever wood you have access to, pile on compost and manure, and plant something forgiving in year one. Then watch what happens over the next few seasons. The trajectory is reliably upward.
FAQ
What is hugelkultur, simply explained? Hugelkultur is a raised garden bed built over a buried core of logs and woody debris. As the wood decomposes over years, it retains water like a sponge, releases nutrients, and creates a loose, aerated growing environment. The result is a self-improving garden bed that gets easier to maintain over time.
Does hugelkultur rob nitrogen from plants? Fresh wood can tie up nitrogen temporarily as decomposition begins. This is most problematic in the first year. Using older, partially rotted wood reduces the effect significantly. Adding manure, compost, or grass clippings in the upper layers compensates for it. Planting legumes in year one is the most practical organic fix.
How tall should a hugelkultur bed be? Anywhere from 18 inches to 5 feet, depending on your goals and neighborhood tolerance. Taller mounds hold more water and have more planting surface area, but they also settle significantly as the wood decomposes. A bed 18 to 24 inches tall is a reasonable starting point for most home gardeners.
What wood should I avoid in a hugelkultur bed? Avoid black walnut and cedar — both produce compounds that can suppress plant growth. Otherwise, most deciduous wood is fine. Partially rotted logs are ideal; fresh logs work but create more nitrogen drawdown in year one.
How long does a hugelkultur bed last? A bed built with large logs can remain productive for a decade or more, slowly improving as the wood breaks down. Smaller-diameter wood breaks down in three to five years, after which the bed functions more like a conventional raised bed with very good organic matter content.
Can I build hugelkultur in a raised bed frame? Yes. Many gardeners fill the bottom half of a raised bed frame with logs and branches before filling with soil. This reduces the cost of filling deep beds with purchased soil and creates the same decomposing wood core effect. It works well and looks much more neighborhood-friendly than a freestanding mound.