
If you’ve got terrible soil, a concrete driveway, bad knees, or just not enough space for a traditional garden, a straw bale garden might be exactly what solves your problem. It sounds a little unconventional — growing tomatoes in a bale of straw? — but this is a genuinely practical method with real research behind it, and it works well for a surprisingly wide range of crops.
The core idea: a straw bale becomes a self-contained growing medium as it decomposes from the inside. You condition the bale over a couple of weeks, plant directly into it, and then maintain it like any container garden through the season. At the end of the year, the whole thing goes into your compost pile or directly onto your garden bed as a soil amendment. No digging required.
Why Straw Bale Gardening Actually Makes Sense
The appeal is obvious for anyone gardening on poor ground. But straw bale gardening isn’t just a workaround — it has some genuine advantages even for people with decent soil.
According to University of Missouri Extension, straw bales provide excellent conditions for root growth, particularly for tomatoes. The decomposing straw heats up from within (useful for extending the season), retains moisture well, and earthworms actively move into the conditioned bale and help plants thrive. You also tend to see fewer pest problems compared to in-ground gardening, because the bale keeps plants slightly elevated.
For gardeners with mobility issues, the setup is genuinely ergonomic — a standard bale sits around 18 inches off the ground, which is a meaningful difference from bending to soil level.
Straw vs. Hay: Get This Right First
This is the mistake that sinks a lot of first-time bale gardeners. Straw and hay are not the same thing.
Straw is the dried, hollow stem left after grain crops (like wheat or oat) are harvested — it’s essentially free of seeds. Hay is cut grass and legumes intended as animal feed, and it’s full of seeds that will happily germinate in your bale and compete with everything you’re trying to grow. Clemson Extension is clear on this: wheat straw bales are the best choice. Alfalfa or oat straw can work, but avoid hay entirely.
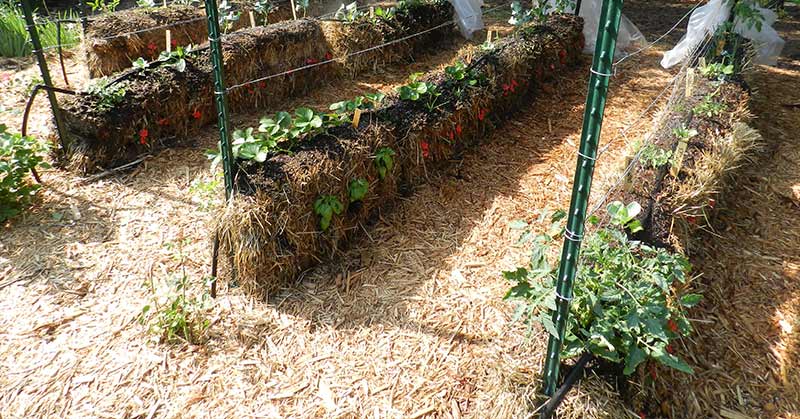
Bales cost roughly $8–$15 depending on your region and can usually be found at farm supply stores, feed stores, or directly from local farms. A standard two-string bale is about 2 feet wide by 3 feet long — enough space for two or three tomato plants, or four to six smaller crops.
The Conditioning Process: The Step Most People Rush
This is the part that can’t be skipped, and it takes about two weeks. Alabama Cooperative Extension describes it this way: conditioning involves adding water and nitrogen to kickstart decomposition inside the bale, turning it into a living growing medium before you plant anything in it.
Here’s the basic schedule:
- Days 1–3: Soak the bale thoroughly with water and keep it consistently damp.
- Days 4–6: Add ½ cup of high-nitrogen fertilizer (urea works, or substitute bone meal, fish meal, or a balanced organic fertilizer like Espoma Garden-Tone for an organic approach) and water it in deeply.
- Days 7–9: Reduce to ¼ cup of nitrogen fertilizer per day, continue watering.
- Days 10–12: Stop fertilizer but keep the bale moist.
By the end of this process, the interior of the bale should feel warm to the touch — that’s the decomposition happening. If it doesn’t feel warm, give it a few more days. Missouri Extension notes that nitrogen deficiency is the most commonly reported problem in straw bale gardening, so don’t skimp on the conditioning step.
You may see mushrooms emerge from the bale after conditioning. That’s actually a sign the decomposition is working. Don’t eat them — they can be toxic — but don’t worry about them either. They won’t affect your plants.
Where to Set Up Your Bale
Place bales with the baling twine running along the sides (parallel to the ground), not across the top. This keeps the twine from cutting into the bale as it decomposes, and leaves the cut end of the straw facing up — which is where you’ll be planting.
Full sun is essential: at least six hours of direct sunlight per day. Put the bales in their final location before you start conditioning, because once they’re soaked and the composting process begins, they become extremely heavy and nearly impossible to move.
Lay cardboard or several layers of newspaper under the bales to suppress weeds growing up from underneath. This simple step saves a lot of headaches later in the season.
What to Plant (and What to Skip)
Most vegetables that grow well in a raised bed will grow well in a straw bale. The best performers:
- Tomatoes — possibly the single best crop for straw bale gardening; the warm, loose growing medium suits them well
- Peppers and eggplant — both do excellently
- Zucchini and cucumbers — vigorous growers that take to bales readily
- Lettuce, spinach, and salad greens — ideal, especially for cool-season plantings
- Herbs — basil, parsley, chives; the sides of the bale are great for herbs
Root vegetables like carrots, onions, and potatoes are possible but challenging — the bale depth may not be sufficient for full root development, and harvesting from compacted straw can be awkward. Corn is generally a poor choice because it grows too tall and becomes unstable.
For more on what vegetables perform best in this kind of contained growing environment, our guide to the best vegetables for raised beds covers a lot of the same territory.
Planting in the Bale
Transplants work better than direct-seeded crops in most cases. To plant a transplant, use a trowel or your hands to separate the straw, create a pocket, lower the plant to its first set of leaves, and let the straw fill back in around it. For seeds, you can either sprinkle a thin layer of potting mix across the top of the bale (the “flatbed” method) and seed into that, or dig small pockets, fill with potting mix, and sow seeds into the prepared medium.
Space plants the same way you would in soil — don’t crowd just because it’s a bale.
Keeping a Straw Bale Garden Going Through the Season
Watering is the main ongoing task. Bales dry out faster than in-ground gardens, especially in hot weather — plan on watering more frequently than you might expect. A soaker hose laid across the top of the bales is genuinely the most efficient approach for anyone growing more than a couple of bales.
Fertilizing continues through the season since nutrients leach out with watering. A balanced fertilizer applied every few weeks keeps plants fed. High-yield vegetable crops are heavy feeders — tomatoes especially will thank you for consistent nutrition.
Watch for yellowing leaves — that’s typically a nitrogen deficiency signal, and it’s common in straw bale gardens. A dose of liquid nitrogen fertilizer (fish emulsion works well) usually corrects it quickly.
What Happens at the End of the Season
This is one of the more satisfying parts of straw bale gardening. At season’s end, the bale is partially decomposed and can go directly onto your garden beds as a mulch or soil amendment, or into the compost pile. You’ve essentially made compost while growing vegetables — which is a fairly elegant outcome for something that started as a bale of straw from the farm supply store.
Bales typically last one season, though some gardeners get a second year out of a bale by using it for lighter crops or flowers in year two.
Starting Your Straw Bale Garden
Get your bale placed and start conditioning about two weeks before your planned planting date. That’s really the most important timing decision — everything else is fairly forgiving. If you’re growing tomatoes, peppers, or other warm-season crops, that means conditioning should begin around the time of your last frost date.
For anyone experimenting with alternative growing methods, straw bale gardening pairs well with ideas for making the most of a small vegetable garden — both approaches are about creative use of whatever space and resources you actually have. Start with one or two bales, grow something you eat, and see how the season goes.
FAQ
What’s the difference between straw and hay for bale gardening? Straw is the hollow stem left after grain harvest — minimal seeds, great for gardening. Hay is cut grass and legumes intended as animal feed, packed with seeds that will sprout in your bale. Always use straw, not hay. Wheat straw is the most widely recommended.
How long does conditioning take? About 12–14 days. The process involves watering and adding nitrogen fertilizer to trigger decomposition inside the bale. You’ll know it’s working when the interior feels warm to the touch.
Can I plant in a straw bale without conditioning it? You can, but results are poor. Without conditioning, the decomposing straw will steal nitrogen from your plants as it breaks down, causing yellowing and stunted growth. Conditioning prevents this by getting the decomposition started before your plants go in.
How many plants fit in one bale? Two to three tomato plants, or four to six smaller plants (peppers, herbs, greens). Don’t overcrowd — space plants as you would in soil.
Do straw bale gardens need more water than regular gardens? Yes. Bales dry out faster than in-ground beds, especially in summer heat. Check moisture daily and plan to water more frequently. A soaker hose makes this much more manageable at scale.
Can I reuse a straw bale for a second year? Sometimes, for lighter crops or flowers. Most bales are too decomposed for heavy feeders by year two, but they can still work. At the end of their usefulness, add them to your compost pile or use as mulch — nothing goes to waste.