

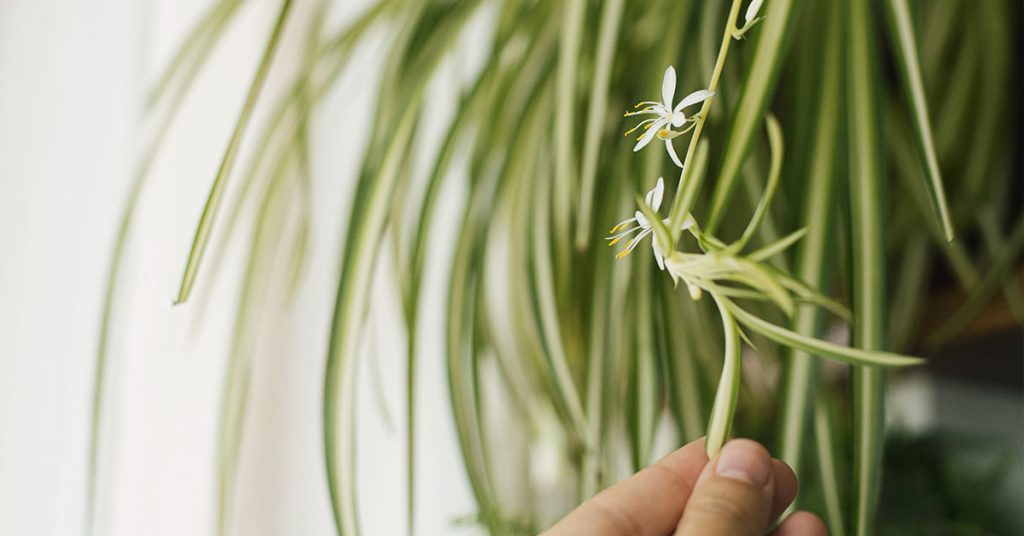
Spider plants (Chlorophytum comosum) are one of my all-time favorite houseplants—those arching, variegated leaves and dangling spiderettes just light up any windowsill! Native to the tropical and southern regions of South Africa, these tough, easygoing plants seldom become invasive in typical indoor settings, though outdoors in warm climates they can self-seed under ideal conditions. Over time, however, even the most vigorous spider plant can outgrow its home, leaving you with a pot-bound root system that struggles to thrive.
I know how it feels when your leafy companions start looking a bit sorry for themselves—maybe the soil seems to vanish overnight or the plantlets aren’t forming like they used to. It’s such a bummer when you realize your green friend is crying out for more space! Below are eleven clear signs that it’s time to give your spider plant a fresh pot and some nutrient-rich soil so it can continue dazzling you for seasons to come.
Stunted Growth and Reduced Spiderettes
When a spider plant’s wonky root system runs out of room, new growth simply hits the brakes. You might notice that your plantlets—those adorable “baby” offshoots—either stop forming or stay tiny, as though they can’t muster the energy to develop fully. I remember one season when my plant yielded just two measly spiderettes after producing a bumper crop the year before!
This slowdown happens because cramped roots can’t take up water and nutrients efficiently. By repotting into a container one size larger filled with fresh, well-draining potting mix, you’ll revitalize root function. Once roots have room to spread, you’ll see a burst of new shoots and plenty of robust spiderettes ready to cascade over the pot’s edge!
Roots Circling the Pot
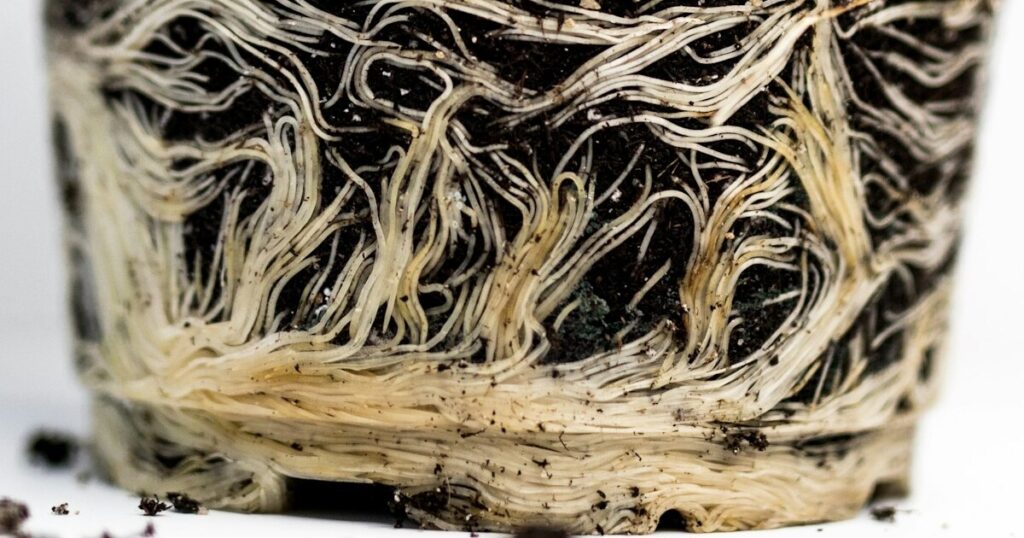
Peek into the drainage holes or gently lift your spider plant—do you see a tangled mess of white roots spiraling around the pot’s interior? That’s a classic “root-bound” condition indicating the roots have simply run out of soil to explore. I once neglected this sign until my pot literally lifted itself off the saucer!
Circling roots can strangle the plant, preventing healthy root branching and leading to nutrient deficiencies. Repotting breaks up these tight coils and encourages fresh roots to grow outward into the new soil. You’ll provide space for a more robust root network, which translates to healthier, greener foliage above!
Salt Buildup on the Soil Surface
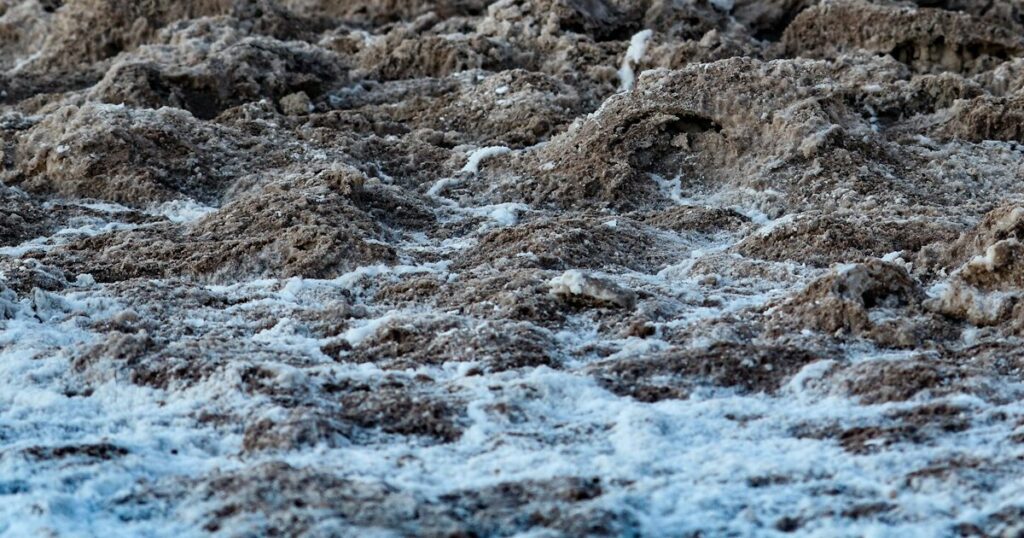
If you’re an occasional fertilizer fan (I certainly am!), you may notice a white, crusty film forming on the soil surface or around the pot’s rim. That’s mineral salts accumulating from hard tap water and fertilizer—ultimately reducing soil permeability. I once thought my spider plant was thirsty, only to discover those salts had formed a hardened cap!
A crusty soil surface also makes it harder for water to penetrate, leading to dry patches and uneven moisture. Gently remove the top inch of soil when you repot, and rinse the root ball to wash away excess salts. Fresh potting mix gives your plant a clean slate and ensures even water uptake!
Overcrowded Spiderettes
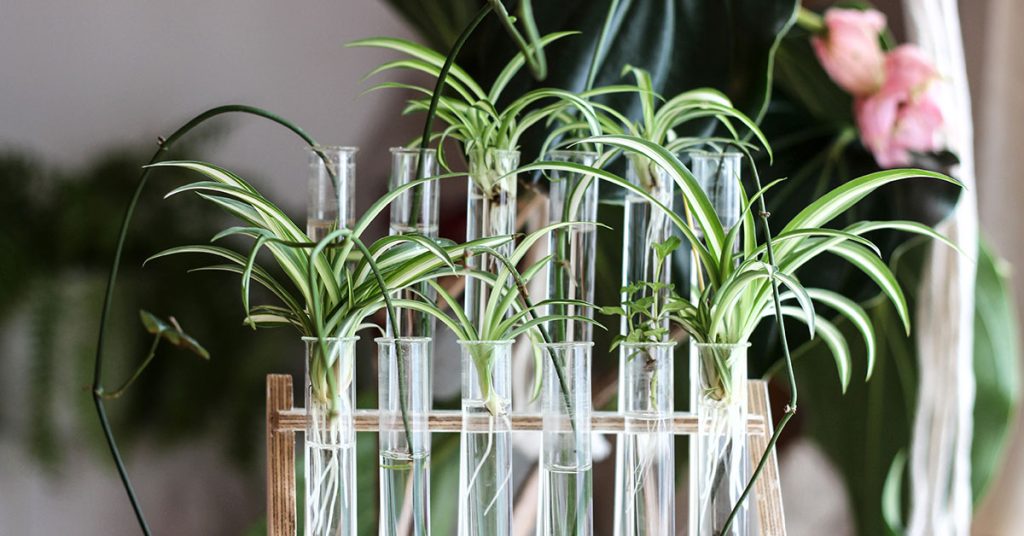
Spider plants are prolific producers of those charming little plantlets that dangle like living ornaments. But too many offshoots can make the mother plant feel cramped and compete for the same limited resources. I once counted over thirty spiderettes on one clump—beautiful, but the pot could barely support the weight!
Thinning out some of the baby plants and repotting the central crown into a larger pot helps balance energy between the parent and its offspring. You can also root those extra spiderettes in water or separate pots to share with friends. Everybody wins when each plant has enough space to grow!
Soil Compaction and Crusting
Over months or years, the potting mix beneath your spider plant can settle and compact, losing its light, airy structure. Compacted soil holds water too long in spots and drains too fast in others, confusing your plant’s thirst signals. I felt so bad when I realized my neglect had compacted the soil into a nearly brick-like block!
Fresh potting mix, ideally a blend with peat moss or coconut coir, restores that fluffy, well-draining environment spider plants adore. Upon repotting, gently tease the old soil away from the roots to encourage them outward, then backfill with fresh mix for uniform moisture and oxygen flow.
Yellowing Leaves with Brown Tips

Brown-tipped spider leaves are common, but when they’re coupled with broad yellowing, it often signals that the plant is starving for nutrients or that the roots are exhausted. I once blamed low humidity for browning tips until I realized those yellow bands meant my plant was pot-bound and spent.
Repotting into fresh soil replenishes essential nutrients, and you can mix in a slow-release organic fertilizer to sustain growth. In a roomy pot with fresh medium, you’ll see new leaves come in a rich green again, with crisp, clean variegation and tip-to-base vitality!
Wilting Between Waterings

Spider plants like consistent moisture, but when their roots have no space, they start to wilt rapidly—even if you just watered! I remember rushing to water mine daily, only to have it flop over by evening. The constant cycle of desperate thirst isn’t healthy.
When you repot, roots are surrounded by fresh, moisture-holding soil with better aeration, so they won’t dry out overnight. A judicious watering schedule—wet thoroughly, then allow the top inch to dry—becomes easy to maintain once the roots have room to breathe and store moisture.
Water Pooling on the Soil Surface

If you find water puddling atop the soil and refusing to sink in, that compacted old mix or salt buildup might be repelling moisture. My spider plant’s soil turned so hydrophobic that I had to water for ten minutes straight before any water infiltrated!
Repotting with a light, porous mix solves this by allowing water to percolate evenly, reaching thirsty roots. To prevent future compaction, consider mixing in perlite or orchid bark for added drainage. Your plant—and any little critters that might be trying to nest in soggy spots—will thank you for the improved environment!
Pot Cracks or Bulging

Ceramic and clay pots sometimes crack under constant root pressure, and plastic containers can bulge when roots push against the sides. I was shocked to find a hairline crack in my favorite glazed pot, all because the roots had filled every nook and cranny!
Spotting cracks early can save both plant and pot. Lift the plant gently and, if you feel resistance or see fissures, it’s definitely time to upgrade. Transitioning to a sturdier, slightly larger pot ensures the root ball has room without risking breakage—plus, you can choose a fresh décor piece!
Signs of Nutrient Deficiency

Even with occasional fertilizing, a cramped root mass can’t absorb enough nutrients; new leaves emerge pale or smaller than usual. I once noticed my youngest, central leaves looking washed-out compared to the vibrant older foliage, and realized the soil was spent.
Repotting into fresh, organically enriched mix instantly rejuvenates nutrient availability. You’ll see stronger, deeply colored new growth and renewed vigor. If you like, add a dash of worm castings or balanced organic fertilizer to give your spider plant a sustained nutrient boost!