
Celery is one of those vegetables that seems easy on paper but can be frustrating to grow if you don’t understand its quirks. If you’ve ever ended up with skinny, bitter stalks or limp little plants instead of the crisp, juicy bunches you were hoping for, you’re not alone. Celery (Apium graveolens), native to the Mediterranean and Middle East, is a marsh-loving biennial that needs consistent moisture, rich soil, and a good bit of patience. It’s not considered invasive, but it is a bit particular about its growing conditions.
The good news? Once you get the hang of what celery wants, it can absolutely flourish in your garden. I’ve learned through trial and error (and a lot of disappointing first attempts!) that celery rewards a gardener who’s attentive and strategic. If you’re dreaming of big, crunchy, satisfying stalks you can actually snack on straight from the garden, these tips will help you get there—whether you’re growing a row in your backyard or slipping a few plants into a raised bed!
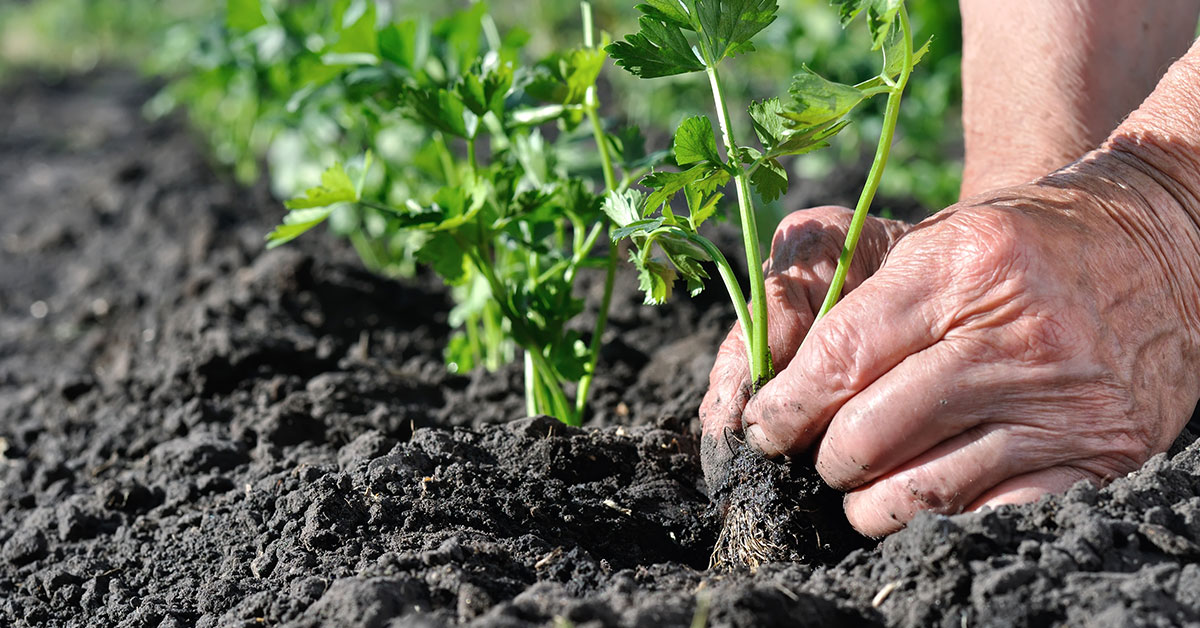
Start With Strong Transplants or Early Seeds
Celery is a slow grower, so starting with healthy, vigorous seedlings gives you a serious head start. If you’re growing from seed, start them indoors 10–12 weeks before your last frost date. They take a long time to germinate, so patience is key—and a heating mat can help speed things up. Thin seedlings early so each one has enough space to grow a strong root system.
If you’re buying starts from a nursery, look for stocky plants with several leaves and thick bases. Avoid leggy, pale seedlings—they’ll struggle to catch up. Celery has a long growing season (up to 140 days in some varieties!), so the sooner you can get it in the ground and settled, the better chance it has of developing those beautiful, full stalks.
Keep the Soil Moist—Constantly

Celery evolved in wetlands, so it absolutely thrives in moist, rich conditions. One of the biggest mistakes I’ve made in the past was letting my celery dry out even once during the growing season. Inconsistent watering leads to stringy, bitter, or cracked stalks—definitely not what you want when you’re dreaming of a juicy crunch.
To keep the soil evenly moist, I mulch heavily around the base of the plants with straw, compost, or even shredded leaves. This helps retain moisture and keep the shallow root zone cool. I also water deeply at the base every few days—more often during hot spells. Trust me, celery loves to drink, and if you keep it hydrated, it’ll reward you in a big way!
Feed Celery Generously Throughout the Season

Celery is a heavy feeder, and it needs lots of nutrients to build those thick, ribbed stalks. I always start by working compost or well-aged manure into the soil before planting. Then, throughout the growing season, I top-dress with compost every few weeks and use a balanced organic fertilizer every 3–4 weeks to give them a steady nutrient supply.
You’ll know if your celery isn’t getting enough food—its leaves will turn pale, and the stalks will be skinny and slow-growing. When it’s properly nourished, though, celery takes on that signature deep green color and starts thickening up nicely. Don’t be shy with the compost—celery loves a rich, living soil!
Choose the Right Location With Full Sun

While celery loves cool weather, it still needs full sun to grow to its potential. I aim for at least 6–8 hours of direct sun per day. That sun is what fuels steady growth, especially in the early season when plants are trying to build strong roots and lush foliage. Without it, you’ll likely end up with weak or floppy stalks.
I’ve tried growing celery in partial shade before, and while it survived, it never bulked up the way I wanted. If full sun isn’t available in your garden, consider using reflective surfaces like white garden fabric or foil around the plants to bounce light back in. It may sound silly, but it makes a real difference!
Space Plants Properly to Encourage Airflow

Crowding celery plants too close together is a recipe for disappointment. Not only will they compete for nutrients and moisture, but lack of airflow can lead to mildew, rot, and stunted growth. I always space my celery about 8–10 inches apart in rows that are at least 12 inches wide—enough room for those big outer stalks to stretch and breathe.
Proper spacing also makes it easier to mulch, weed, and harvest without damaging neighboring plants. Celery doesn’t like competition, and giving each plant a bit of personal space leads to stronger growth and fewer pest issues. When they have the room they need, they’ll reward you with big, crisp bunches every time!
Blanche the Stalks for Tender Texture

Blanching doesn’t mean cooking—it’s the practice of wrapping or shading celery stalks during the last few weeks of growth to keep them pale and tender. Left exposed to sun, celery can develop a strong, bitter taste. Covering the stalks helps produce that mild, supermarket-style flavor many gardeners are after.
You can tie the outer leaves together or wrap the stalks with newspaper, cardboard, or a collar made from recycled milk jugs. Start blanching about two weeks before your expected harvest. I’ll admit, it’s an extra step, but if you’re aiming for that classic, sweet crunch, it’s so worth the effort!
Protect From Aphids and Slugs

It’s such a bummer when pests take over just as your celery is looking its best! Aphids love to cluster around young celery leaves, and slugs can be a nightmare for tender lower stalks. I’ve had the most success using floating row covers early in the season to keep aphids at bay and spreading crushed eggshells or diatomaceous earth to deter slugs.
You can also encourage beneficial insects like ladybugs and lacewings by planting calendula, dill, or alyssum nearby—natural allies that feed on aphids. Keeping the area around your celery weed-free and mulched helps cut down on slug hiding places, too. Healthy plants can bounce back from light pest damage, but it’s so much easier to prevent problems than fix them later!
Harvest Gradually to Extend the Season

Celery doesn’t have to be harvested all at once. In fact, you’ll often get bigger, better stalks by harvesting a few outer stems at a time as they mature, leaving the inner ones to keep growing. I find this method not only stretches the harvest but encourages the plant to keep producing new growth.
When I want to harvest an entire head, I cut the stalks low at the base with a sharp knife—but often I’ll just pull off what I need for cooking that day. Harvest in the early morning for the crispiest, most flavorful results. Celery stores best when trimmed and refrigerated immediately, but nothing beats the taste of a stalk snapped straight from the garden!
Watch the Weather and Plan Accordingly
Celery likes cool weather but not frost, so timing is everything. It grows best between 55–75°F and can bolt (go to seed) if temperatures spike or drop suddenly. I always transplant mine in early spring or late summer depending on the season—this gives them enough time to grow during their preferred conditions.
If a heatwave’s coming, I use shade cloth to keep things cooler. And during late frosts, a row cover or cloche protects young plants from stress. When you baby your celery through the weather extremes, it pays you back in plump, flavorful stalks that don’t get stringy or bitter. Keeping an eye on the forecast is part of the celery-growing rhythm!
Choose Bolt-Resistant or Self-Blanching Varieties

Not all celery is created equal, and some varieties are much better suited to home gardens than others. If you’ve had trouble in the past, try a bolt-resistant type like ‘Tango’ or ‘Utah 52-70 Improved’—these are bred to handle variable weather and still produce thick, delicious stalks. I’ve had great luck with ‘Golden Pascal’ and ‘Ventura’ too!
Some cultivars are even self-blanching, meaning their inner stalks stay pale and tender without extra covering. These varieties tend to form tighter bunches and require a little less fuss, which is perfect if you’re gardening in a hot or unpredictable climate. Reading those seed packet details makes all the difference when selecting your celery dream team.