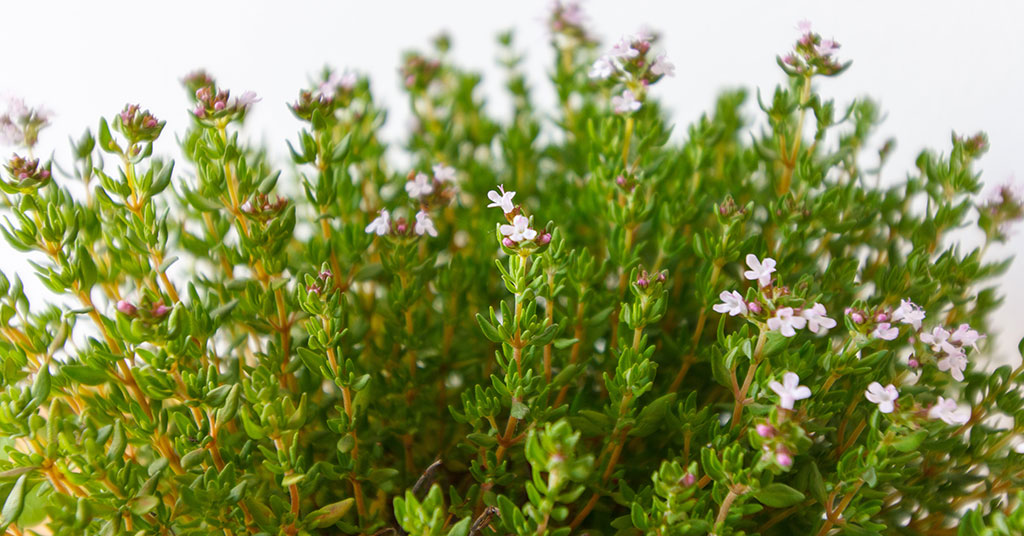

Thyme’s aromatic, silvery-green foliage and delicate blooms can transform any garden into a fragrant haven, but even this tough Mediterranean native (Thymus vulgaris) can falter when routine errors sneak into your care. I know how thrilling it is to imagine creeping thyme carpeting your rock garden, only to return and find sparse patches or soggy stems! It’s such a bummer when promise turns to disappointment—especially when those buzzing solitary bees, which nest in the dry, bare soil nearby, were counting on your blooms.
Having tucked thyme into containers, herb beds, and crevice gardens over the years, I’ve learned that a few simple missteps can derail even the hardiest plants. In this article, I’m excited to share ten mistakes to avoid—each with a deep dive into why it matters, how thyme behaves (including its non-invasive tendencies), and tips that will keep your thyme thriving season after season.
Overwatering or Poor Drainage

Though thyme appreciates occasional moisture, soggy soil suffocates roots and invites rot. I once planted a thyme patch in heavy clay without amending it—within weeks, stems were blackened and mushy! Thyme’s native habitat features rocky, well-drained slopes, so mimicking those conditions with sandy loam or grit-packed beds is key.
Improving drainage can be as simple as raising beds or mixing coarse sand into your soil. By letting the root zone dry between waterings, you’ll see sturdier stems and more intense fragrance—and you’ll spend less time wrestling hoses and more time enjoying those pollinators visiting your blooms!
Skipping Spring Pruning

It’s tempting to let thyme spread unchecked, but neglecting a light trim each spring leads to woody, leggy growth that flowers poorly. I learned this the hard way when my thyme formed a sparse, twiggy mound of dead wood by summer! A quick shearing back of up to one-third of new shoots encourages fresh, vigorous branching.
That tidy haircut not only revitalizes your thyme but also keeps its low-mounding habit intact—perfect for those nesting little bees looking for open soil edges. Plus, frequent pruning means more leafy sprigs for the kitchen, not hollow stems left behind!
Planting in Too Much Shade

Thyme demands at least six hours of direct sun to develop its oils and maintain compact growth. I once sheltered a thyme planter under a tree canopy—only to find long, floppy stems and pale leaves. Full sun exposure ensures deep green foliage and prolific flowering!
Sun-warmed soil also appeals to ground-nesting pollinators that burrow in bare patches. When your thyme basks in sunlight, both plant and insect communities thrive together, creating a lively, balanced garden.
Crowding Plants Too Closely

While thyme can spread, giving each plant space—about 8–12 inches apart—prevents competition for water and air circulation. I remember cramming seedlings into a tight grid, then spending hours battling mildew on crammed foliage. Proper spacing lets breezes sweep through, reducing fungal risks.
Roomy planting also provides nesting sites for solitary bees, which prefer bare soil near their forage plants. By keeping thyme clusters gently apart, you foster a healthy ecosystem instead of a humid breeding ground for disease.
Using the Wrong Mulch

Heavy organic mulches like wood chips hold moisture against thyme’s crown, inviting rot. I once layered shredded bark around my thyme and lost half the bed to damp conditions! Instead, opt for an inorganic mulch—gravel or fine pebbles—that reflects heat, suppresses weeds, and keeps the soil base dry.
This mimics thyme’s native rocky slopes and saves you from endless weeding. Plus, the reflective surface brightens the garden and helps nearby pollinators spot those pink and purple blooms from afar!
Neglecting Soil pH and Fertility

Thyme thrives in slightly alkaline to neutral soils (pH 6.5–7.5). Planting in overly acidic ground can stunt growth and dull the herb’s flavor. I once battled spindly thyme in a freshly tilled veggie patch—an inexpensive soil test revealed a pH below 6. A sprinkle of lime brought those leaves back to life!
Because thyme isn’t invasive, it relies on you for a hospitable medium. Amending with garden lime or crushed oyster shell and adding just a touch of compost ensures balanced nutrients without the lush excess that invites fungal issues.
Ignoring Pest and Disease Signs

Though hardy, thyme can attract spider mites in hot, dry spells or develop root rot if conditions stay damp. Early detection—looking for fine webbing or yellowing leaves—means you can intervene before major damage strikes. I once overlooked a mite infestation until half my patch looked bronzed and brittle! A gentle spray of water and introduction of predatory mites restored balance.
Maintaining proper airflow and dryness, plus monitoring each week, keeps thyme healthy and reduces time spent battling outbreaks. And when your patch is healthy, it continues to nourish those beneficial insects that help control other garden pests.
Planting in Compact Soil
Dense, unamended soil restricts thyme’s shallow roots, causing stress and sparse foliage. I used to jam thyme into heavy garden beds—after switching to a raised rock bed with gritty soil, those plants exploded with growth! Thyme’s roots crave loose material to spread horizontally, seeking moisture pockets.
Loosening the top few inches and blending in coarse sand replicates its native terrain. Your thyme will reward you with fuller mats and an irresistible fragrance whenever you brush past!
Harvesting Incorrectly
Pinching off too many leaves at once or cutting into woody wood can weaken thyme plants. I once snipped back entire stems for cooking, leaving little foliage for photosynthesis—my patch took weeks to recover! Instead, harvest leaf pairs from the ends of fresh growth, leaving at least two sets of leaves behind.
Regular, light snips promote bushier growth and extend your harvest window. Plus, the remaining stems continue to bloom, attracting pollinators and providing habitat continuity for spring-nesting bees.
Failing to Provide Winter Protection
In colder regions, thin-mulching with straw or covering with breathable fabric can shield thyme from freeze–thaw cycles that heave crowns. I lost a beloved variety one winter to crown lift—after switching to a light burlap wrap, it emerges flawless each spring! Avoid heavy mulch that traps moisture, opting instead for just enough to mitigate soil movement.
A little winter prep means less time replacing plants come spring and ensures your thyme starts the season vigorous, ready to carpet pathways and host the first pollinators of the year!